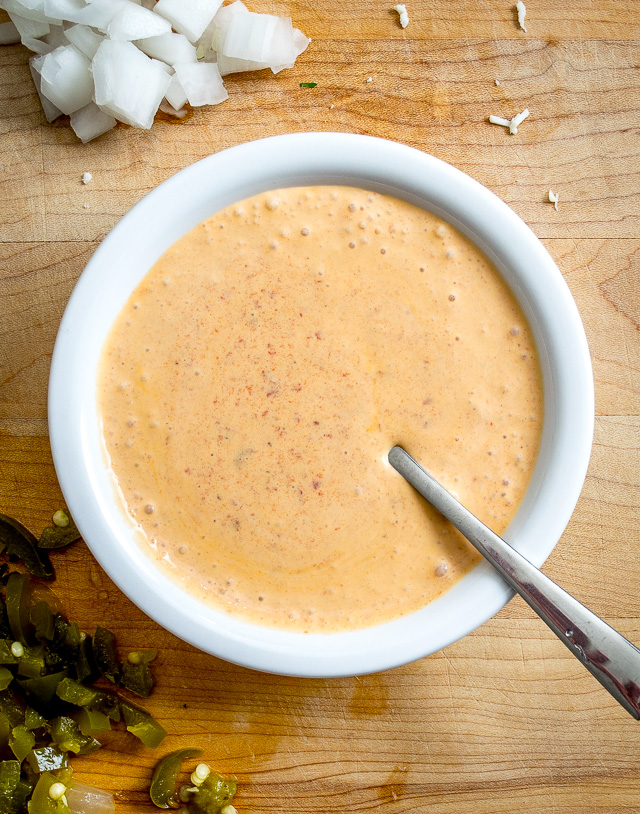
• Skip to primary navigation
  • Skip to main content
  • Skip to primary sidebar
  • Skip to footer

How Did You Cook That

  • Recipes
    • Main Dishes
      • Street Corn Soup
      • Maple Ginger Chicken and Asparagus
      • Homemade Gnocchi with Garlic and Parmesan
      • Loaded Baked Potato Soup
      • Beef Bourguignon
      • Grilled Salmon Tacos
      • Thai Inspired Shrimp Curry Soup
      • Chicken and Sausage Gumbo
      • Cast Iron Skillet Pizza
        • Vegetarian
          • Creamy Sweet Potato Curry
          • Pan Tossed Vegetarian Noodles
          • Zucchini & Mushroom Bucatini
          • Stir Fried Baby Bok Choy
          • Roasted Red Pepper and Tomato Soup
          • Potato Leek Soup
          • Portobello “Steak” and Potatoes
          • Cheesy Cauliflower & Carrot Soup
    • Companions
      • Roasted Garlic Tomatoes with Thyme
      • Crisp Green Salad with Sweet Honey Vinaigrette
      • Zucchini Fritters
      • Easy Flat Bread
      • Animal Style French Fries (Copy Cat Version)
      • Cheesy Jalapeno Cornbread
      • Buffalo Cauliflower Bites
    • Breakfast
      • Chilaquiles Rojos with Eggs
      • Sour Cream and Onion Biscuits
      • Dutch Baby with Blueberries
      • Blueberry Lemon Muffins with Streusel Topping
      • Egg In A Jar
      • Creamy Acai Bowls
      • Baked Irish Oats with Cream
      • Fluffy Buttermilk Pancakes
      • Original French Crepes
      • Vanilla Spiced Overnight Oats
      • Seriously Delicious Waffles
      • Southern Buttermilk Biscuits
    • Sauces
      • Creamy Thousand Island Dressing
      • Spicy Mango Salsa
      • Favorite Avocado Recipes
      • Loquat Marmalade
      • Adobo Chile Aioli
    • Desserts
      • Number One Ice Cream
      • Loaded Trail Mix Cookies
      • Toasted Candied Pecans
      • Angel Food Loaf Cake
      • Easy Banana Zucchini Bread
      • Triple Chocolate Cake with Whipped Ganache Frosting
      • Key Lime Cheesecake
      • Cinnamon Sour Cream Coffee Cake
      • Zach’s Chocolate Chip Cookies
      • Strawberry Rhubarb Galette
      • Spiced Cheesecake
      • Berry Fruit Crumble
      • Banana Cinnamon Crunch Bread
    • Thirst Quenchers
      • The Forager Cocktail
      • Cucumber Cilantro Gin Tonic
      • Sunrise Glow Smoothie
      • Three Day Ginger Beer
  • Experiences
    • Los Angeles Pop Ups – Zoe Food Party
    • Los Angeles Bread Crawl
    • The Great Outdoors (A Basic Pantry List)
  • Food Muse
    • A Note About Sugar
    • No More Plastic!
    • Best Buttermilk Substitutions
    • Prepping and Storing Cilantro
    • Home Roasted Coffee
  • Sugar Loaf
    • How to Feed a Sourdough Starter
    • Sourdough Pancakes
    • Sourdough Country Bread Loaf
  • About
  • Navigation Menu: Social Icons

    • Facebook
    • Instagram

How Did You Cook That

Adobo Chile Aioli

May 31, 2019 by How Did You Cook That

Aioli Sauce

When friends come into town, I love to set up a taco bar and let everyone feast and forage.  Last week, with friends in town from the Bay Area, I set out a bowl of adobo chili aioli for everyone to drizzle over their grilled veggie tacos. You will find this sauce to be a little lighter and not as thick as a traditional aioli. It’s meant to pour.

Aioli is so simple to mix up and requires minimal ingredients that you probably already have on hand in your fridge and pantry. You can make the mayo fresh yourself or use good store bought mayonnaise.

In a pinch, when you are camping or, like me, have a construction project going on in your kitchen, just grab a cup of very good mayonnaise instead of using the oils and egg. You can easily mix in all of the other ingredients in a bowl with a spoon.

This recipe is for Jaymie, my friend and huge home-cook inspiration.

Adobo Chile Aioli
Print Pin

Adobo Chile Aioli

Simple garlic aioli with Adobo chiles and oil
Course Appetizer
Keyword aioli, Dip, sauce
Total Time 10 minutes minutes
Servings 8

Ingredients

  • 4 medium garlic cloves, minced
  • 1 4 oz adobo chiles, in oil reserve 1 Tbsp adobo oil for mixture
  • 1/2 cup extra virgin olive oil
  • 1/2 cup canola oil
  • 1 large egg
  • 2 tsp fresh squeezed lemon juice
  • 1 tsp dijon mustard

Instructions

  • Blend garlic, Dijon mustard and egg in food processor until completely blended. About 15 seconds.
  • Keep the food processor running and slowly drizzle in olive oil and then drizzle in canola oil and 2 Tbsp reserved adobo oil until completely combined. Turn off food processor and 2 - 3 chiles (or to taste). Add lemon juice and salt and pulse until thoroughly combined. Scrape down sides. Pulse one more time. Refrigerate for about 30 minutes to let flavors mingle.
  • Aioli can be refrigerated for up to 3 days.

Notes

For a simple aioli just leave out the adobo.
In a pinch, when you are camping or, like me, have a construction project going on in your kitchen, just grab a cup of very good mayonnaise instead of using the oils and egg. You can easily mix in all of the other ingredients in a bowl with a spoon.
You can make so many varieties of aioli simply by adding the ingredients you want that will enhance the dish you are serving it with.
Variation ideas:
Fresh chopped dill, roasted garlic, jalapeno, cilantro & lime, rosemary,
 

Filed Under: Sauces

Los Angeles Pop Ups – Zoe Food Party

May 16, 2019 by How Did You Cook That

Zoe Food Party. A seriously fun name for this small neighborhood feasting spot in Highland Park. Crowds go to parties and Zoe’s little corner of the city is indeed, a party. The cozy backyard space is filled with families, friends, children and neighbors meeting together to share a deliciously intriguing breakfast together.

Zoe starts making her pitas early Tuesday to serve on Wednesday mornings at 8:00AM. Her pitas are simple, perfectly golden, round pockets of tender soft bread. Beautiful even before they are filled with her ever-changing flavorful ingredients. Crunchy carrots, pickled radishes, fresh dill and fennel tops, scrambled eggs, roasted potatoes, fresh cream and bright orange edible nasturtiums. Those are just some of this week’s ingredients. Show up next week and you’ll get a totally different and delightful taste surprise.

You can get your hands on one of these substantially sized breakfast pitas for $10 and by the time you walk around to the front of the building to order a cup of coffee at Collage your pita will be ready.

Get there early. You’ll see her little pink sign propped out on the sidewalk along York Blvd. She opens at 8:00AM and always sells out.

Find Zoe Food Party on IG and Twitter @zoefoodparty

Filed Under: Tips

Loquat Marmalade

May 10, 2019 by How Did You Cook That

Jams Jelly Fruit

In June the trees around Los Angeles are dripping with golden ripe loquats. Tons, litterally, tons of them. Little orange globes falling to the ground and all over the sidewalk. As soon as I see them ripening I know it’s time to get out the canning jars and make loquat marmalade.

There’s enough fruit on these trees to feed an army and they usually go forgotten every year. I suspect, like myself once, that nobody knows what the heck to do with these little treats.

Loquat marmalade or jam is relatively easy to make, requiring only 4 ingredients and it is seriously delicious. The tedious part is removing the large seed and separating the flesh from the skin. This yummy condiment makes a sweet morning treat on a toasted slice of bread. Yum.

So, walk next door and meet your neighbors with the heavy laden loquat tree in their yard. I’ll bet they’ll be happy to have you take some fruit off their hands. Blend the extra loquats up into a Forager Cocktail and you’ll have a good reason to invite them over to happy hour.

Jams Jelly Fruit
Print Pin

Loquat Marmalade

When loquats are dripping from the trees in your neighborhood, grab a basket and gather them up for a great big batch of spicy lemony jam.
Course Breakfast, condiments, Dessert, sauces
Cuisine American
Keyword condiments, sauce
Prep Time 1 hour hour
Cook Time 45 minutes minutes

Ingredients

  • 4 cups golden loquats, washed and seeded weight is AFTER seeds and core have been removed. I peeled mine but you can leave some or all of the skin on if you prefer.
  • 2 cups sugar
  • 1 lemon finely grate the peel
  • 1 tsp pure vanilla

Instructions

Preparation

  • Gather jars for canning and warm them in the oven.
  • Pull washed loquats apart and remove seeds. Skin peels off easily if you wish to remove. It is OK to leave skin on for this recipe

Cooking

  • You should have approximately 4 cups after seeding and peeling. If you have less, that is fine. The ratio of loquat to sugar is always the same 2:1
  • Put seeded loquats in a large saucepan on the stove
  • Add 2 cups sugar
  • Add grated lemon peel and squeeze lemon juice into pan
  • Add vanilla
  • Cook at a low boil for 40 minutes, stirring constantly, until thickened. There is a lot of natural pectin in loquats so you will not need to use any thickener. KEEP CLOSE TO THE POT AND STIR FREQUENTLY. Sugar burns quickly and the whole mixture will stick to the bottom of your pan.
  • Remove warm jars from oven and fill with marmalade.
  • Let completely cool before tightening the lids.
  • Store in refrigerator.

Filed Under: Bites and Tastes, Desserts, Sauces

Banana Cinnamon Crunch Bread

May 9, 2019 by How Did You Cook That

Bread Dessert Bake

Have you got some bananas ripening to a golden brown on your counter? Well then, it’s time for some banana bread.

This crunchy-topped loaf of banana bread is the best thing since…well, you know. Cinnamon crunchy goodness on top of sweet gooey banana and cinnamon filling is so good!  This bread has some chewiness to it, created by the oats added to batter. Cinnamon, banana and oats come together for scrumptious twist on an all-time favorite quick bread.

Bread Dessert Bake
Print Pin

Banana Cinnamon Crunch Bread

Banana Bread with a crunchy cinnamon topping
Prep Time 15 minutes minutes
Cook Time 1 hour hour
Servings 8
Calories 225kcal

Ingredients

  • 3-4 Ripe bananas
  • 2 large eggs
  • 1/3 cup coconut milk Substitute cow's milk if coconut milk is unavailable
  • 1/4 cup canola oil
  • 1 tsp pure vanilla
  • 1 1/2 cup all-purpose flour
  • 3/4 cup quick oats For a nuttier, chewier version, use regular rolled oats
  • 2/3 cup sugar Granulated
  • 2 tsp baking powder
  • 1/4 tsp baking soda
  • 1 tsp Kosher salt
  • 1/2 cup OPTIONAL: chopped pecans or walnuts

Topping

  • 1/2 cup brown sugar, loose, not packed Granulated sugar will work for this step too
  • 1/4 cup all-purpose flour
  • 2 Tbsp softened butter
  • 1 1/2 tsp cinnamon

Instructions

  • Preheat oven to 350°
  • Grease 9x5 loaf pan with butter.
  • In a medium bowl combine flour, oats, sugar, baking soda, baking powder, salt.
  • In a large bowl mash the bananas then combine eggs, coconut milk, vanilla and canola oil.
  • Add dry ingredients to the wet mixture and stir until just combined.
  • Make the topping by combining flour, cinnamon, butter and sugar and mix until it resembles wet sand.
  • Pour half of the batter into loaf pan.
    Sprinkle half of cinnamon mixture over the top.
    Cover with remaining batter.
    Sprinkle remaining cinnamon topping over the batter.
  • Bake at 350° for 50-60 minutes. Stick in a toothpick and see if it’s clean.

Filed Under: Baking, Breakfast, Desserts

Grilled Portobello Mushrooms

April 28, 2019 by How Did You Cook That

Portobello Mushrooms and Potato Dinner

Grilled Portbello Mushrooms. When you’re craving a big juicy steak and potatoes dinner but you’re trying to eat less meat. It’s the great American comfort food with a twist of deliciousness.

Portobello mushrooms are now common in grocery stores. These giant ‘shrooms are sturdy and easy to cook or grill. They have a meaty, not too mushroom-y taste plus they soak up the flavor of anything you marinate them in.

Pair a juicy grilled Portobello mushroom with garlic smashed potatoes, open a bottle of red wine, and you’ve got a feast.

Portobello Mushrooms and Potato Dinner
Print Pin

Grilled Portobello Mushrooms

This simple "steak" and potatoes dinner is perfect for that night when you're feeling like a little grilled steak but want to opt out of meat.
Course Dinner
Cuisine American
Keyword Dinner, Grill, vegan
Prep Time 10 minutes minutes
Cook Time 25 minutes minutes
Total Time 35 minutes minutes
Servings 2

Ingredients

  • 2 large Portobello Mushrooms
  • 3 large Yukon Gold or Russet potatoes peeled and cut into small cubes
  • 3 cloves garlic peeled and slightly smashed
  • 1/4 cup Vegetable or chicken broth
  • 1 Tbsp olive oil
  • 1 bottle Your favorite Cabernet Sauvignon or Syrah
  • salt and pepper to taste
  • 5 Tbsp Kosher salt

Instructions

  • Preheat oven to 400º.
    Start up your BBQ grill.
    Fill a large stock pot with cold water and a generous amount of salt. Add the chopped potato pieces and bring to a gentle boil. Continue boiling until potatoes are fork tender.
    Tip: Always start boiling potatoes in cold water and bring to a boil. This will allow them to cook evenly from the inside out rather than outside in.
    Place garlic cloves in small baking dish and drizzle with olive oil. Set garlic in oven to bake and caramelize for 10 minutes.
    Set mushrooms top side down on a plate to prep. Pour about 1/8 cup of wine over mushrooms. Drizzle on olive oil. Salt and pepper to taste. Set aside to marinate.
    Drain potatoes and return to pot. Add broth and caramelized garlic and smash together. Make potatoes as chunky or as smooth as you like. Add salt and pepper to taste.
    Grill mushrooms for 10 minutes.
    Pour the wine.
    Serve on a bed of garlic smashed potatoes and your favorite green veggie.

Filed Under: Main Dishes

Southern Buttermilk Biscuits

April 28, 2019 by How Did You Cook That

When I first moved out of my parent’s home and ventured out on my own I was armed with packages of Top Ramen and blue boxes of Kraft macaroni and cheese. Seriously. That was the extent of my cooking knowledge. 

Then I moved to Houston where the women were incredulous that I didn’t know a thing about baking biscuits, let alone roll out the dough. They quickly set out to instruct me in the fine art of southern biscuit making. I wasn’t the best student but one thing I did learn was that 85 year old Texas women swear like no women I had ever met before.  I never did bake biscuits that resembled anything but 10 year old hardtack.

Then one day…

I was visiting my daughter and she started baking up biscuits for breakfast. Just like that! Pulling out flour and butter and rolling out dough like she does this every morning. What?! She can make biscuits? I had to have her teach me the sacred magic.

We pulsed, patted, rolled, cut and laughed for hours at the memories of our beloved Nanno yelling at each of us in the kitchen whenever we couldn’t master her “simplest” recipes.

And guess what? I actually baked this flaky delectable treat on the first try. It is so easy, so quick and tastes like heaven dripping with honey or fresh berry preserves. Load them with peaches and cream and you’ve got the best summer dessert on the block.

Please let me know about your experience baking these biscuits. Or any other family food experiences that make you smile.

Print Pin

Southern Buttermilk Biscuits

Perfect buttery, flaky biscuits that are high and lofty. These traditional southern biscuits come out just right, every time.
Course Breakfast, Dinner, Lunch
Keyword Baking, Biscuits
Total Time 30 minutes minutes
Servings 8

Ingredients

  • 2 1/2 cup all-purpose flour
  • 1 cup cold buttermilk
  • 1 1/2 Tbsp baking powder
  • 1 tsp salt
  • 1 tsp sugar
  • 8 Tbsp unsalted butter frozen and cut into cubes
  • 2-3 Tbsp salted butter melted, for brushing on top

Instructions

  • Preheat oven to 425°.
  • Sift flour, baking powder, sugar and salt into a large mixing bowl. Transfer to a food processor (or leave in the bowl and cut butter in by hand with a pastry blender or two butter knives). Add cubed frozen butter and pulse 6 or 7 times until it becomes a loose crumble. Place crumbled dough back in large mixing bowl, dig a little "well" into the center of it, add buttermilk and stir with a spatula until it forms a rough ball. The dough will be a little sticky.
  • Turn the dough out onto a floured surface and roll it into a rough rectangle, about an inch thick. Fold it over and gently roll it down again. Repeat 6 times.
  • Roll out the dough one more time into a rectangle. Cut dough into round biscuits using a floured drinking glass or biscuit cutter. PRESS CUTTER STRAIGHT DOWN INTO DOUGH. Do not twist cutter because it will crimp the edges of the biscuit tight and it will not rise. Your biscuits will be flat, not flaky. Press leftover dough together and roll again to make additional biscuits until dough is used up.
  • Place biscuits on a baking sheet and into the pre-heated 425° oven. Make sure biscuits are touching each other. Bake until golden brown, for about 15 minutes. Remove from oven, brush with melted butter and serve warm with honey or fresh fruit preserves.

Filed Under: Baking, Breakfast

Thai Inspired Shrimp Curry Soup

April 28, 2019 by How Did You Cook That

Soup Cook Food Recipe

The results of this Thai Shrimp Curry Soup delighted the heck out of me. It was the first Asian inspired soup I had ever made and I had no idea how the ingredients would blend together. The combination of lemongrass, coconut milk and red curry paste marry together to create a soup that is pure comfort.

If you haven’t cooked with lemongrass it is a little different to work with. There are a few ways to prepare it and many traditional Thai cooks have a way that is uniquely theirs. I will explain the way I prepare this unusually delicious and aromatic plant to use in this recipe.

Traditionally this soup is make with rice but I chose to substitute riced cauliflower to add crunch and sweet nuttiness to the dish.

Soup Cook Food Recipe
Print Pin

Thai Shrimp Curry Soup

Coconut, Lemongrass and Red Curry combine with riced cauliflower to deliver a soup that is warm, spicy and delicious.
Course Dinner, Lunch
Keyword Soup, Vegetarian
Total Time 40 minutes minutes
Servings 4

Ingredients

  • 8 oz 26-30 count shrimp peeled and tails removed
  • 2 stalks lemongrass, one smashed, one finely minced You can find lemongrass in most modern grocery store produce departments
  • 1 13.5 can coconut milk unsweetened
  • 6 oz vegetable or chicken stock
  • 1/2 cup riced cauliflower
  • 2 clove garlic minced
  • 1 fresh ginger 1 inch piece
  • 1 lime
  • 1 sweet red pepper
  • 2 green onion/scallion
  • 2 Tbsp Red Curry Paste You can find this in the Asian food section of most grocery stores and Sprouts
  • 2 tsp coconut palm sugar or brown sugar
  • 1 Tbsp olive oil or coconut oil

Garnish

  • 1 bunch cilantro washed well
  • 5 florets baby bok choy
  • 1/4 cup mung bean sprouts

Instructions

  • Saute shrimp in coconut or olive oil until just pink. Set aside.
    Using the back of a large knife or a kitchen mallet, smash 1 stalk lemongrass to release the aromatics. Lemongrass is very tough, so you will have to give it some muscle.
    In a medium-sized pot, bring the vegetable stock, coconut milk, riced cauliflower, minced garlic, ginger and smashed lemongrass to a boil. Once boiling, turn the heat down to low and simmer 10 minutes.
    Remove root end and green tops of remaining lemongrass stalk and chop.
    Tips to prepare lemongrass
    Saute red pepper, chopped lemongrass and green onion in the pan used to saute shrimp. Add red curry paste and brown sugar or coconut palm sugar to completely coat vegetables.
    Add sauteed red pepper, onion, and shrimp to simmering vegetable broth and continue to simmer for another 5-10 minutes. Adjust taste of red curry paste if desired.
    Pour into bowls. Garnish with green onions, cilantro, baby bok choy or mung bean sprouts

Filed Under: Companions, Main Dishes

Spiced Cheesecake

April 28, 2019 by How Did You Cook That

baking cheesecake dessert

This Spiced Cream Cheesecake looks like a million bucks and tastes even better. It is a dessert that is far easier to pull off than it looks and when I share it at parties there is more than one comment of, “Look! Someone brought a cheesecake from Cheesecake Factory!” But you’ll have the last laugh when that same guest takes a bite and says, “Oh! This is 1,000 times more delicious than ______________________!”

I top my cheesecake with sweet sour cream because my mom and grandmother topped their cakes that way. Some traditions are tough to let go of.

baking cheesecake dessert
Print Pin

Spiced Cheesecake

Spiced Cheesecake with a ginger snap crust and fresh grated nutmeg
Course Dessert
Keyword Cheesecake, Dessert
Total Time 2 hours hours 35 minutes minutes
Servings 8

Ingredients

Crust

  • 1 1/2 cup Ginger Snaps I use Whole Foods Ginger Snaps
  • 1/4 cup Granulated sugar
  • 1/4 cup Ground almond meal or ground pecans I have also used a combination of nuts for interesting flavor variety
  • 5 Tbsp Melted butter
  • 1 pinch Kosher salt

Filling

  • 5 large eggs, separated yolks from whites
  • 3 8 oz pkg cream cheese, at room temperature MUST BE AT ROOM TEMPERATURE. If your cream cheese is cold it will not incorporate and you will not have a smooth cheesecake.
  • 1 1/2 cup granulated sugar, divided set aside 1/4 cup of sugar
  • 1/4 cup all-purpose flour sifted
  • 1 cup sour cream
  • 2 1/2 Tbsp lemon juice
  • 1 1/2 tsp pure vanilla extract
  • 1 tsp Kosher salt
  • 1/4 tsp fresh ground nutmeg I use whole nutmeg and grate with a rasp. You can find this in the bulk spice section of Sprouts or Whole Foods

Instructions

  • MAKE THE CRUST
    Crush the ginger snaps with a rolling pin.
    If using pecans or almonds, rather than almond meal, pulse the pecans or almonds in a food processor until fine.
    Combine crushed ginger snaps, sugar, ground nuts or almond meal, and salt in a bowl.
    Drizzle melted butter and stir until evenly moistened. Press into the bottom and up the sides (as far as it'll go) of a lightly buttered 10-inch springform pan.
    Refrigerate for at least 1 hour to set.
  • Preheat oven to 325°
  • MAKE THE FILLING
    In a large mixing bowl or the bowl of a stand mixer, combine cream cheese, 1 cup of sugar, and salt and beat until smooth.
    Add flour and egg yolks and mix thoroughly. Stir in sour cream, lemon juice, vanilla and nutmeg and beat until smooth.
    In a separate bowl, beat egg whites with remaining 1/4 cup sugar until it forms stiff peaks.
    Fold thoroughly into cream cheese mixture; no need to be too gentle with it, just be sure the whites are evenly incorporated.
    Pour into chilled crust.
  • Bake cheesecake for 1 hour 15 minutes or until top is puffed and lightly golden brown. There will be cracks in the top, but your sour cream topping will fill that in.
    Without opening the oven door, turn the oven off, and let the cheesecake cool inside for 1 hour. DO NOT take the cheesecake immediately out of the hot oven or it will fall.
    After an hour, remove cheesecake and heat oven to 450°.
    While the cheesecake is cooling, make the sour cream topping by whisking the sour cream, 1/4 C. sugar and vanilla together until smooth.
    Once the cheesecake has cooled on the counter for an hour, pour the sour cream mixture over top. Using a rubber spatula, smooth out the surface.
    Place back into the oven (remember the oven should now read 450° F) and bake for about 10 minutes. Remove from the oven and place on a cooling rack to let cool to room temperature.
    Refrigerate the cheesecake overnight to set.
    DON’T PUT THE CHEESECAKE IN THE FRIDGE UNTIL IT HAS COMPLETELY COOLED. THE DRASTIC TEMPERATURE CHANGE WILL CAUSE IT TO CRACK.
  • To serve, sprinkle top with ground nutmeg, shaved chocolate or pile on cherries or berries.

Filed Under: Baking, Desserts

Home Roasted Coffee

April 28, 2019 by How Did You Cook That

Home Roasted Coffee Beans

How do you take your coffee? I take mine home-roasted with a little cream.  Since I discovered roasting my own beans at home over the stove, my morning ritual has never been the same.

I’m always up for re-purposing little-used kitchen items.  I experimented with a vintage Jolly Pop stove top popcorn popper and it worked like magic!

The lid of the Jiffy Pop has a nifty little crank handle that turns a slim bar inside the pot that shuffles the beans as they roast. The result is a perfect, even roast. Adjust the heat of the stove as necessary in order to get one, two or three “cracks” from your beans. If you’re impatient like me, cheat a little and open the lid to peek inside and check the color of the beans. Shake the pot occasionally in order to prevent the beans from burning. There’s nothing worse than a burned tasting cup of Joe.

The entire roasting process takes about 15 minutes but you get the best tasting brew 3 days after roasting. Roasting and brewing on the same day will not deliver an ideal cup of coffee. Patience is key here.

In California, I buy my beans locally from Kean Coffee, a roaster in Orange County. If you do a little searching, you can find distributors online who will ship green coffee beans directly to your house.

My little coffee experiment turned into a passion and I didn’t spend a fortune getting into it. The Jiffy Pop fits my hiking and camping lifestyle too. It travels with me, entertains the heck out of me over the camp stove and usually gets a chuckle out of the barista and coffee roaster when they ask what kind of roaster I use.

Filed Under: Breakfast, Thirst Quenchers, Tips

No More Plastic!

April 28, 2019 by How Did You Cook That

Last week I had the awesome, humbling experience of cleaning up a stretch of the LA River with a group called FoLAR and a couple thousand local volunteers. What a great community we have here in Los Angeles.

The biggest take away for me was a renewed conviction of reducing and, ultimately eliminating, plastics from my kitchen, my closet and my home. We drink plastic, eat plastic, cook with it, wear it on our bodies, sleep in it and on it and store our food in it. Last weekend I filled huge trash bags with it.  Literally tons of plastic bottles, bags, clothes, Styrofoam, straws, children’s toys, and storage containers were floating in the river. More waste from our everyday lives than any city realistically needs.  We are conditioned to believe that plastic is the cleanest and most convenient option for storage available. It’s easy and often it’s the only option we are given.

I posted these waxed cotton food wraps on Instagram last year when I saw them in my local Trader Joe’s. (No, this isn’t a pitch for Trader Joe’s. As you can see from the image, there is a display of plastic bottles right behind this basket…case in point. TJ’s just happened to be the cheapest and most convenient place, at the time, that I discovered these, outside of the internet.)

If reducing your plastic consumption is high on your list this year, consider giving these little goodies a try. I love them and use them to wrap up veggies, leftover dinner, condiments, sauces…anything. If you don’t like the sizes, grab a pair of pinking shears and trim away!

Filed Under: Tips

  • « Go to Previous Page
  • Page 1
  • Interim pages omitted …
  • Page 6
  • Page 7
  • Page 8
  • Page 9
  • Go to Next Page »

Primary Sidebar

Hi food lovers. Welcome to my kitchen.

If you're looking for simple dishes made with wholesome, seasonal ingredients, you've come to the right place. Grab a fork and take a bite. Dig In →

Coriander Seeds
Strawberry Rhubarb Galette
Coconut Peach Popsicles

Categories

Favorite Resources

Cook Books

What’s New

  • Roasted Garlic Tomatoes with Thyme
  • Crisp Green Salad with Sweet Honey Vinaigrette
  • Number One Ice Cream
  • Street Corn Soup
  • Egg In A Jar

Footer

  • Email
  • Facebook
  • Instagram
  • YouTube

Find Recipes

Never Miss a Recipe

Copyright © 2025 How Did You Cook That on the Foodie Pro Theme