• Skip to primary navigation
  • Skip to main content
  • Skip to primary sidebar
  • Skip to footer

How Did You Cook That

  • Recipes
    • Main Dishes
      • Street Corn Soup
      • Maple Ginger Chicken and Asparagus
      • Homemade Gnocchi with Garlic and Parmesan
      • Loaded Baked Potato Soup
      • Beef Bourguignon
      • Grilled Salmon Tacos
      • Thai Inspired Shrimp Curry Soup
      • Chicken and Sausage Gumbo
      • Cast Iron Skillet Pizza
        • Vegetarian
          • Creamy Sweet Potato Curry
          • Pan Tossed Vegetarian Noodles
          • Zucchini & Mushroom Bucatini
          • Stir Fried Baby Bok Choy
          • Roasted Red Pepper and Tomato Soup
          • Potato Leek Soup
          • Portobello “Steak” and Potatoes
          • Cheesy Cauliflower & Carrot Soup
    • Companions
      • Roasted Garlic Tomatoes with Thyme
      • Crisp Green Salad with Sweet Honey Vinaigrette
      • Zucchini Fritters
      • Easy Flat Bread
      • Animal Style French Fries (Copy Cat Version)
      • Cheesy Jalapeno Cornbread
      • Buffalo Cauliflower Bites
    • Breakfast
      • Chilaquiles Rojos with Eggs
      • Sour Cream and Onion Biscuits
      • Dutch Baby with Blueberries
      • Blueberry Lemon Muffins with Streusel Topping
      • Egg In A Jar
      • Creamy Acai Bowls
      • Baked Irish Oats with Cream
      • Fluffy Buttermilk Pancakes
      • Original French Crepes
      • Vanilla Spiced Overnight Oats
      • Seriously Delicious Waffles
      • Southern Buttermilk Biscuits
    • Sauces
      • Creamy Thousand Island Dressing
      • Spicy Mango Salsa
      • Favorite Avocado Recipes
      • Loquat Marmalade
      • Adobo Chile Aioli
    • Desserts
      • Number One Ice Cream
      • Loaded Trail Mix Cookies
      • Toasted Candied Pecans
      • Angel Food Loaf Cake
      • Easy Banana Zucchini Bread
      • Triple Chocolate Cake with Whipped Ganache Frosting
      • Key Lime Cheesecake
      • Cinnamon Sour Cream Coffee Cake
      • Zach’s Chocolate Chip Cookies
      • Strawberry Rhubarb Galette
      • Spiced Cheesecake
      • Berry Fruit Crumble
      • Banana Cinnamon Crunch Bread
    • Thirst Quenchers
      • The Forager Cocktail
      • Cucumber Cilantro Gin Tonic
      • Sunrise Glow Smoothie
      • Three Day Ginger Beer
  • Experiences
    • Los Angeles Pop Ups – Zoe Food Party
    • Los Angeles Bread Crawl
    • The Great Outdoors (A Basic Pantry List)
  • Food Muse
    • A Note About Sugar
    • No More Plastic!
    • Best Buttermilk Substitutions
    • Prepping and Storing Cilantro
    • Home Roasted Coffee
  • Sugar Loaf
    • How to Feed a Sourdough Starter
    • Sourdough Pancakes
    • Sourdough Country Bread Loaf
  • About
  • Navigation Menu: Social Icons

    • Facebook
    • Instagram

Main Dishes

Crisp Green Salad with Sweet Honey Vinaigrette

July 27, 2021 by How Did You Cook That

Citrus Salad

Simple green salads with fresh fruit look so beautiful and taste divine. This fresh crisp salad is no exception. Here are a couple of tricks to add to your arsenal that’ll ensure your salad is bright and super tasty.

Most importantly, you gotta get the dressing into all the right places without weighing down the fresh fruits and lettuces. In order to do this just layer and drizzle, layer and drizzle. No tossing of this salad.

You can make this salad with or without berries. The real magic here is in the prep. For example, each leaf of lettuce gets washed and brown ends removed. It may seem like a tedious step but it yields an amazing salad.

The vinaigrette had just a simple few ingredients that you probably have on hand in your pantry. When added all together your salad will scream, “eat me now!”

Green Salad
Print Pin

Crisp Green Salad with Sweet Honey Vinaigrette

Crisp green salad with sweet honey vinaigrette. Make it with or without fresh fruit.
Course Main Course, Side Dish
Keyword Salad, vegan, Vinaigrette
Total Time 20 minutes minutes
Servings 4

Ingredients

Lettuces

  • 2 heads butter bibb lettuce organic
  • 2 large Belgian endive organic
  • 1 Romaine heart organic
  • 1 large grapefruit, peeled, sectioned and cut into ½ inch pieces (optional)
  • 1 pint fresh berries (optional)
  • ideas for added fruit: fresh peaches, avocado, apple (optional)

Vinaigrette

  • 1 large shallot, minced can use a red onion if shallots are not available
  • 2½ Tbsp sherry vinegar
  • 1 Tbsp Dijon mustard
  • pinch red chile flakes
  • 1 Tbsp warm water
  • ¾ cup extra virgin olive oil
  • 1 Tbsp honey
  • 2 sprigs fresh thyme, stripped
  • 1 large clove garlic, grated
  • Kosher salt and ground black pepper

Instructions

  • IMPORTANT: How to wash the lettuces. This step is important to wash off any residual soil or possible contaminants used in packaging. Trust me, you'll notice the difference.
    Fill a large bowl with lukewarm water. Remove wilted and browned leaves from the lettuces.
    Trim each head at the root. Leave butter-lettuce leaves whole. Cut large leaves of romaine and endive in half, then drop into water. Swirl lettuces in water, then drain. Fill bowl again with clean cool water and wash twice more. Rinse one more time with cold water, then transfer to a salad spinner to dry. Gently wrap in paper towels or clean dish towels. Set aside.
  • Rinse minced shallot with cold water. Drain, then place in a medium bowl. Add vinegar and warm water. Let sit for 2 minutes, then whisk in oil, mustard, honey, thyme, garlic and a large pinch of salt. Taste, and adjust salt and vinegar as needed.
  • In a large salad bowl carefully pile a generous handful of the washed lettuces. Add fruit (if using) Sprinkle with salt and pepper. Add a generous drizzle of vinaigrette. Add another handful of salad, more fruit (if using) salt, pepper and vinaigrette. Repeat until lettuces (and fruit) are all in the bowl. Add another drizzle of dressing.
    Serve.
    This salad is best fresh. Be sure to make it just before serving.

Filed Under: Bites and Tastes, Companions, Vegetarian

Street Corn Soup

July 17, 2021 by How Did You Cook That

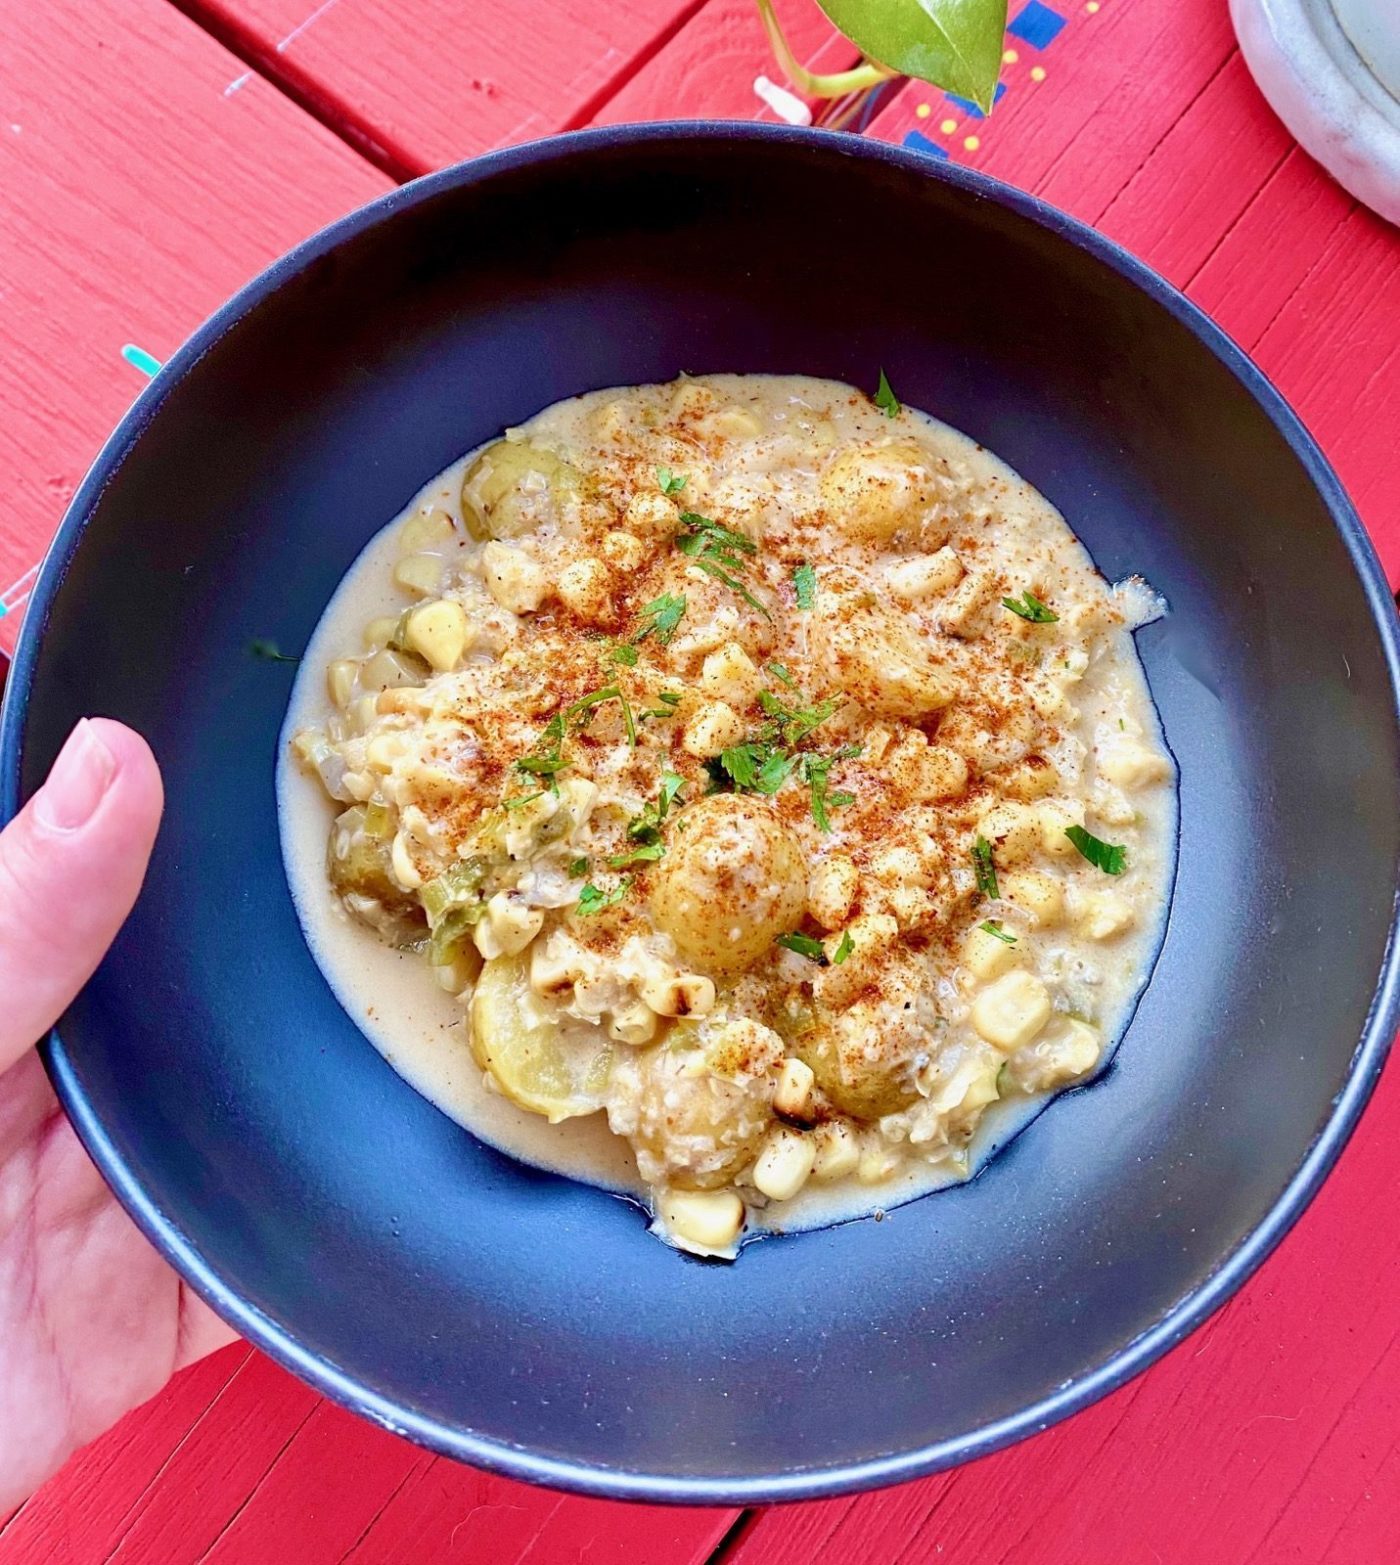
Mexican Street Corn Soup

If you’ve ever stopped at one of LA’s famous elote carts for street corn on the cob, you know. You really know. LocoLotes, the famous Elote Man, El Esquite. These specialty food carts serve up grilled corn on the cob rolled in seasoned mayo then rolled again in cotija. Sprinkled with spicy ground chili…this is Mexican Street Corn and it’s the s#%t.

I make elote at home during the summer, and it’s delish, but eating it on a steamy downtown sidewalk, fresh off the cart is another level. ⁠
Anyway, I decided to try a souped up version of my favorite corn by chopping and tossing all those street vendor ingredients into a pot. What came out is this crazy yummy Mexican Street Corn Soup.

When corn is plentiful during the summer this is a fun twist on the usual corn on the cob. Try adding a little less broth then serve it cold as a corn salsa with chips. Whatever you do, make extra, cuz trust me, you’ll want more. ⁠Street Corn Soup keeps for up to a week in the fridge.

Mexican Street Corn Soup
Print Pin

Street Corn Soup

A souped up version of my favorite street corn made with cream, spices and Mexican cheese.
Course Dinner, Lunch
Cuisine Mexican
Keyword Grill, Soup
Prep Time 10 minutes minutes
Cook Time 1 hour hour
Servings 4

Ingredients

  • 6 ears fresh corn on the cobs
  • 2 Tbsp butter
  • 1 medium red onion chopped
  • 1 medium Fresno or poblano pepper seeded and finely diced
  • 2 large garlic cloves minced
  • 1 tsp dried oregano
  • 1 Tbsp epazote (see note) finely chopped
  • 1 bay leaf
  • 1 cup vegetable broth
  • 3 small to medium potatoes, cut into ½ inch cubes I use small baby gold or baby red potatoes
  • 1½ cups whole milk
  • ½ cup crema mexicana or heavy cream use extra for topping
  • 1 Tbsp ancho chile powder, Tajin or regular chile powder keep bottle handy for topping
  • ⅓ cup cilantro finely chopped, some reserved for topping
  • ½ cup crumbled cotija or queso fresca
  • 1 large avocado (optional, topping)
  • lime wedges (optional, topping)

Instructions

  • Shuck the corn and grill on an open BBQ or use your broiler. You want to get that nice caramel brown char on the outside of the corn. I prefer the BBQ because it doesn't heat up my kitchen and it adds a nice smoky flavor to the corn. This can also be done a day ahead. You can keep the cobs in the fridge for a day till you're ready to cut off the kernels and make the soup.
    Grilled Corn
  • Cut the kernels off the cobs and set aside. Save the cobs too. You will add them to the soup for an extra rich corn flavor.
  • In a large saucepan, saute the onions in butter with the diced peppers
  • When the onions are translucent, add the garlic, oregano, epazote (if using) and bay leaf. Cook for an addition 3-4 minutes then add the, corn, corn cobs and vegetable broth.
  • Allow soup to simmer for about 10 minutes then transfer about ½ of the mixture (without the corn cobs!) to a blender or food processor and puree.
  • Return corn puree to the saucepan and add the potatoes, milk, crema and chile powder. Continue to simmer on low heat until the potatoes are soft. Add more broth if needed. Salt and pepper to taste.
  • Once potatoes are soft, ladle the soup into bowls and top with cotija or queso fresca, sour cream, cilantro and a dash of chile powder. Load on any other toppings that strike your fancy.
  • Grab some chips and salsa, pour yourself an agua fresca and enjoy!

Notes

Epazote (pronounced eh-pah-ZOH-teh) is an aromatic herb commonly used in Mexican cuisine. Both the fresh leaves and tender stems are used in cooking. It has the flavor of oregano, mint, anise and citrus. It's native to Mexico and South and Central America. Here in the US you can find it in the produce section of your local Latin grocery store, usually with the fresh herbs. If you can't find epazote, substitute dried Mexican oregano.

Filed Under: Main Dishes

Seasoned Black Beans

March 2, 2021 by How Did You Cook That

Seasoned Black Beans
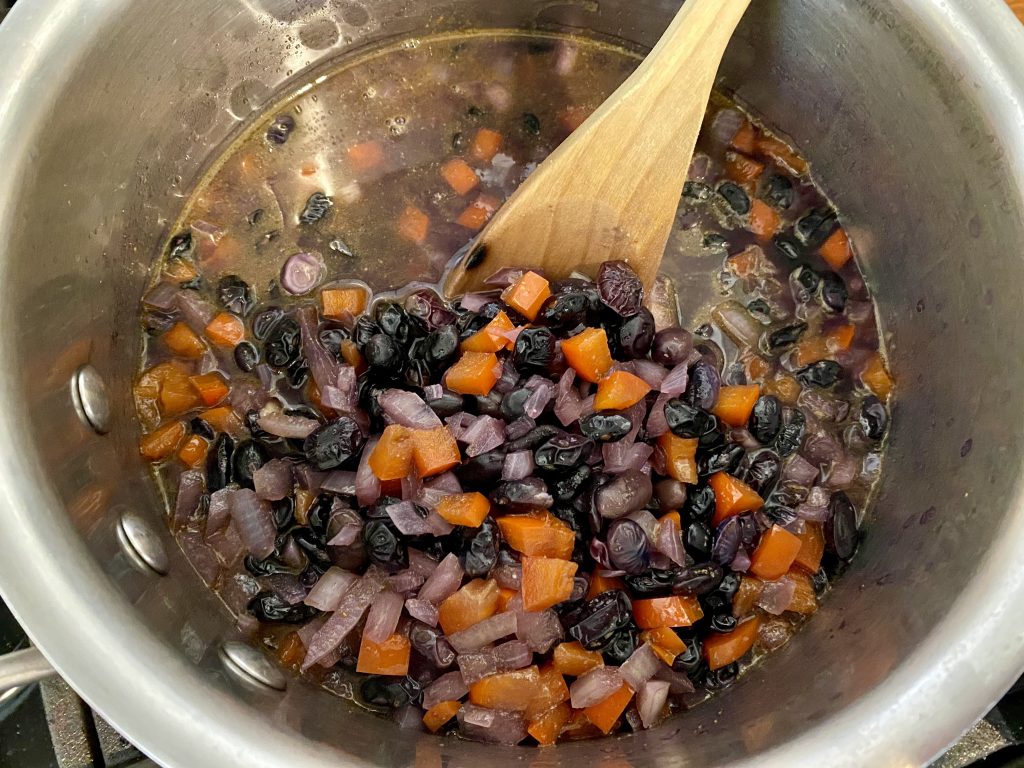
You know those cans of seasoned or Cuban style black beans at the grocery store? I used to buy those beans to keep on hand for a rainy day, but no more!  Slow-cooking dried black beans is one of the best changes I ever made to my pantry. Simmering on the stove, they soak up the savory flavors of onions, sweet red peppers and cilantro. Delicious!
 
Slow-cooking black beans allows them to develop a rich and savory flavor. Use these creamy black beans for soups, tacos, burritos, or anything you can imagine to go with beans. You can even mash them and recook them to make refried black beans. They are so versatile and once you try them, you’ll never look at those canned beans in the same way again.
Seasoned Black Beans
Print Pin

Seasoned Black Beans

Course Dinner, Side Dish
Cuisine American, Mexican
Keyword Beans
Prep Time 10 minutes minutes
Cook Time 2 hours hours
Servings 6

Ingredients

  • 2 cups small dried black beans
  • 4 cups vegetable broth chicken broth works fine too
  • 1 small red bell pepper chopped
  • 1 small yellow onion chopped
  • 2 Tbsp olive oil
  • ⅛ cup fresh cilantro finely chopped
  • 2 tsp salt
  • 1 tsp ground black pepper
  • 1½ tsp cumin
  • ½ tsp cayenne

Instructions

  • Rinse black beans. Set aside to drain.
  • In a medium saucepan heat olive oil and saute red peppers and onions until translucent.
  • *** If you make these beans in a crock-pot, add the sauteed vegetables to the crock pot and then add the rest of the ingredients.
  • Pour in vegetable broth and rinsed black beans.
  • Season with cumin, salt, pepper and cayenne.
  • Bring to a low boil then turn down heat to low. Allow beans to simmer for about an hour, stirring to make sure the beans don't stick to the bottom of the pan. Add water or more vegetable broth as needed to keep the beans nice and brothy.
  • At 1 hour add the chopped cilantro and season to taste. Simmer for another hour or until beans are soft and creamy.
  • Eat immediately or refrigerate up to 1 week.
    Beans can also be frozen for up to 3 months. Transfer the cooled and cooked beans, with the broth, to a freezer-safe bag or re-usable storage container. Remove as much air as possible.
    When freezing, consider separating beans into single serving sizes and write the date on the container.

Filed Under: Breakfast, Companions, Vegetarian

Kung Pao Chicken

February 19, 2021 by How Did You Cook That

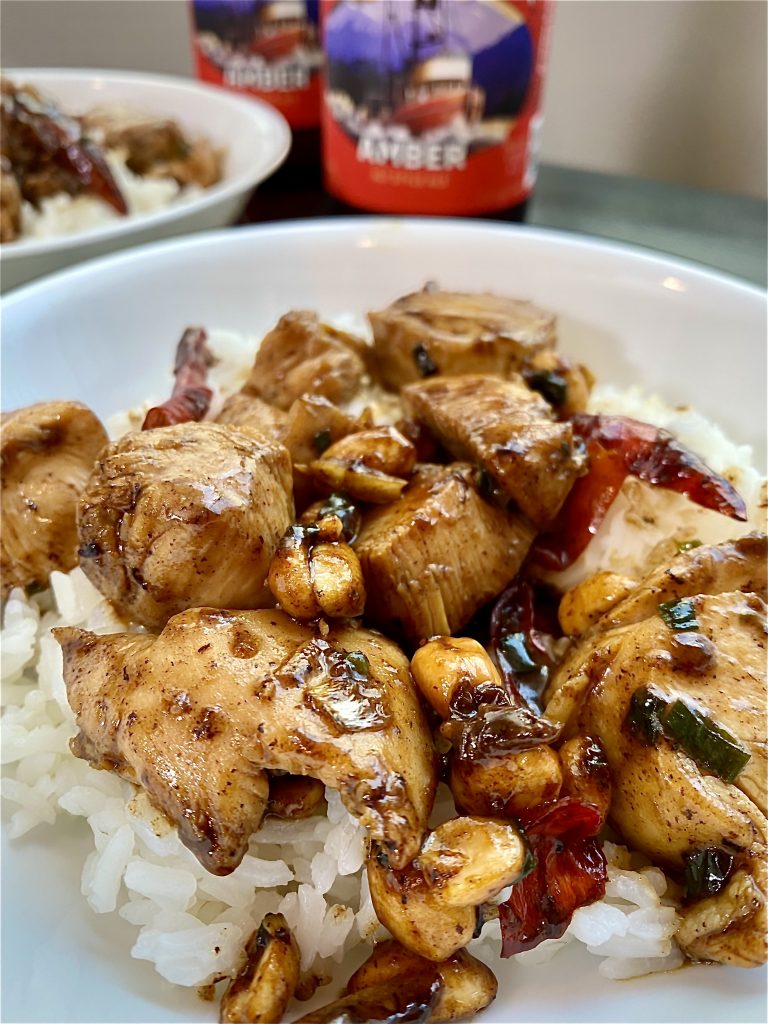
Kung Pao Chicken

Kung Pao Chicken. I love to say it. This dish is one of my favorite entrees to order in a Chinese restaurant. Especially if it’s sweat-on-your-brow spicy.  It’s a traditional Chinese dish made in a wok or skillet. and it packs a punch. The chicken is tossed with ginger, garlic, spicy peppers and Chinese seasonings. The ingredient I really love in Kung Pao Chicken is the roasted whole peanuts tossed in for crunch. Arguably the best part. Peanuts, peanut oil, peanut butter…definitely my super-food. And the spice. Mmm, spice.

If you’re buying the ingredients for the first time stock up and fill your pantry with Asian food items so you can keep making more Asian dishes. All the ingredients, like dried peppers, peanuts, soy sauce, rice wine, and cornstarch keep well in the pantry or fridge. Once you gather them, you’ll find yourself reaching for them again and again.

If you don’t have a wok, use a large heavy skillet. Additionally, any available cut of chicken will do. Fresh, frozen, thighs or breasts. Think of Kung Pao as a toss together and eat kind of meal because there’s never a good reason to obsess about getting everything “just right”. Trust me, it’s all about the sauces and spices. And the peanuts, don’t forget the peanuts. 

Print

Kung Pao Chicken

Servings 4 people

Filed Under: Main Dishes

Shrimp Po’boy Sandwich

February 16, 2021 by How Did You Cook That

Fried Shrimp Po'boy Sandwich

The New Orleans Po’Boy

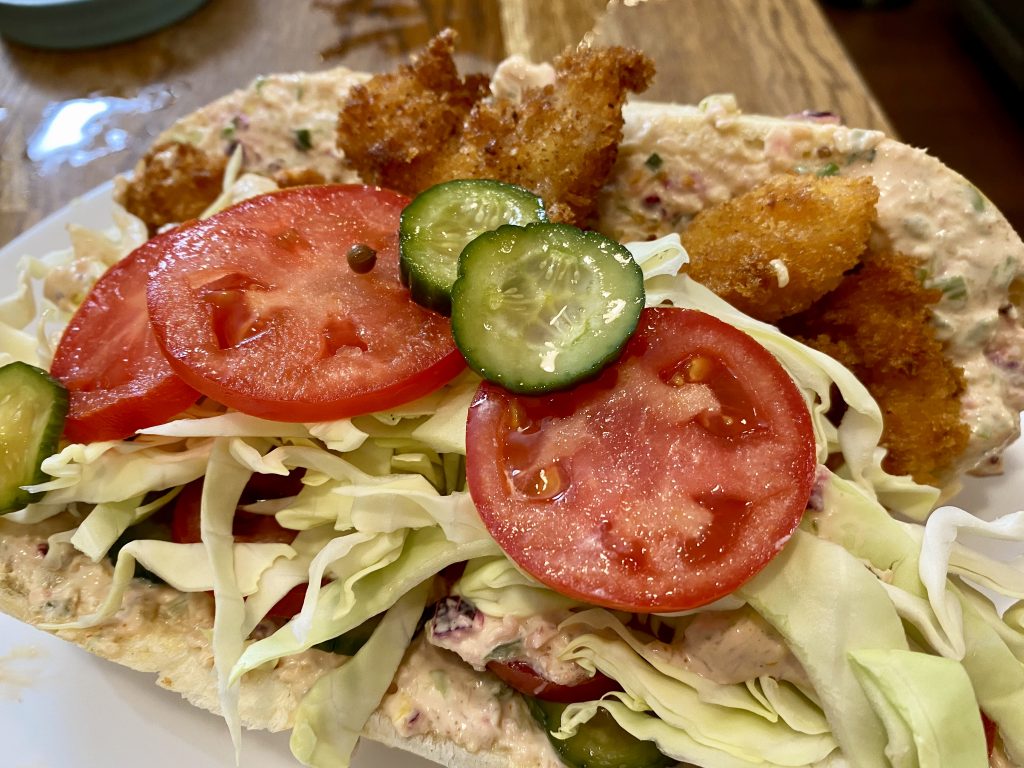
Sinking your teeth into a crispy Cajun fried shrimp po’boy is an experience of a lifetime. Plump and spicy, battered and fried shrimp piled on a perfectly crisp French baguette and dripping with creamy remoulade sauce. That’s what I call living.

This sandwich is called a po’boy because it was originally sold to striking streetcar workers in New Orleans in the 1920s. They were tasty and cheap and quickly got the name, “poor boy” sandwich. They soon became famous among NOLA’s working class dockworkers and tradesmen and because they are so damn delicious they found their way into every corner of society in New Orleans. 

The best po’boy sandwich I’ve ever eaten can be found at Domilise’s Po’boy and Bar along the River in New Orleans.  Grab a bag of Zapp’s chips from the bar, an ice cold bottle of Abita beer or root beer and call it a day.

What makes that sandwich so good? In my humble opinion, it’s the bread. Or the fresher than fresh Gulf Shrimp caught just down the road. But then…there’s the sauce, the remoulade sauce. Definitely the sauce. And it could just be the fact that I was in New Orleans, eating with the locals, my friends and family. A fried shrimp po’boy just feels like “home”.

What’s in a Po’Boy?

Actually, you can order just about any kind of filling for your po’boy. Fried catfish is a local favorite as well as fried oysters and roast beef.

Once you’ve chosen your filling, you’ll need to decide if you want it “dressed” or not. “Dressed” in New Orleans speak means it’s topped with lettuce, juicy tomatoes, sliced dill pickle rounds, and mayo. And if you wanna go for the maximum flavor punch, add a healthy slather of remoulade sauce. Just a fancy name for spiced up mayo. And totally worth the plunge.

Make Your Own Po’Boy

Ok, so you can’t quite get to New Orleans this weekend for a sammy. What to do? Let me tell you, it’s easier than you think. You just have find the right ingredients. And the freshest.

The bread is important and I have found that the best place to get it is a the local Vietnamese Bakery. It’s also the same place I do to buy bread to make Banh Mi sandwiches. Vietnamese baguettes have the perfect combination of lightly crispy crust with a fluffy, chewy crumb. Necessary for a po’boy.

The shrimp is also pretty important. Be sure to get the freshest you can find in your local area. If all you can get your hands on is frozen, that’s ok. Rinse and clean them really well and they’ll do just fine after swimming around in the spicy batter.

I sometimes use shredded cabbage instead of iceberg lettuce, the traditional greenery used on po’boys. The reason for my deviation from the traditional is simply texture. I love a good crunch to my sandwich. Crunchy lettuce is definitely important.

And then there is the remoulade. I’ve made mine borrowing ingredients from the recipes of my favorite sandwich shops. It’s a bit of hybrid and you can do the same with yours to make it your own style.

I fry the shrimp using the same batter recipe and frying method that I use for my Crunchy Fried Dill Pickles. It’s easy and light, super crunchy coating on the shrimp.

Potato chips, icy cold beer or a root beer will take this sandwich over the top. Perfect companions for a dreamy, creamy crunchy concoction that will make you feel like you’re on vacation.

Fried Shrimp Po'boy Sandwich
Print Pin

Fried Shrimp Po'boy

Course Dinner, Lunch
Cuisine Cajun, Sandwich
Keyword Cajun, Sandwich
Servings 2

Ingredients

Remoulade Sauce

  • 1 cup good mayonnaise
  • 3 Tbsp dill pickle relish or chop up some of the bread and butter pickles you're using for the dressing.
  • 1 small to medium shallot minced
  • 1 Tbsp chopped parsley
  • 1 Tbsp freshly squeezed lemon juice
  • 1 Tbsp Tabasco or Crystal hot sauce
  • 1 Tbsp Dijon mustard
  • 1 tsp Worcestershire sauce
  • 1 tsp paprika
  • ¼ tsp cayenne

Shrimp Batter

  • 35-40 raw 16/20 count shrimp peeled and deveined, tails removed
  • 1 cup all-purpose flour
  • 2 Tbsp onion powder
  • 1 tsp baking powder
  • 1 Tbsp Kosher salt
  • 2 tsp cayenne
  • 2 tsp smoked paprika
  • 1 large egg
  • 1 cup milk or buttermilk
  • 1 cup Panko breadcrumbs
  • canola oil for frying

Dress the Po'Boy

  • 4 8"-12" long french rolls, sliced in half French baguettes work very well for the bread.
  • shredded iceberg lettuce or cabbage
  • fresh sliced tomatoes
  • bread and butter dill pickles

Instructions

Remoulade

  • In a medium-sized mixing bowl add all the ingredients and stir like the dickens till they are well incorporated. Set aside in the refrigerator until ready to use.

For the batter

  • In a pie plate, or shallow pyrex dish, mix together all dry ingredients up to the Panko bread crumbs.
    Pour the Panko bread crumbs into a separate pie plate or dish. Season with salt and pepper and extra cayenne if you want to add a little kick to your po'boys.
  • Make a well in the center of the flour mixture and mix in the egg. Then add the buttermilk and stir until smooth.

Fry em up

  • Fill a skillet to about 1" up the sides with canola oil. Line a baking sheet with paper towels.
  • Rinse the shrimp and pat dry. Toss them into the wet batter and let them hang out in there for about 10 minutes or so. Then toss them into the Panko crumbs and let them hang out there for another 10 minutes. The wait time allows the batter and crumbs to really stick onto the shrimp.
  • While your shrimp is hanging around in the batter and seasonings, heat up the oil in the skillet. Heat to shimmering, but not smoking. Be sure to let the oil get hot enough to shimmer or the shrimp will stick to the bottom of the skillet.
  • Carefully drop the battered and breaded shrimp into the hot oil and fry for about 2-3 minutes then flip and fry on the other side for another minute until golden brown.
  • Remove fried shrimp to paper towel-lined baking sheet.

Dress the Sandwich

  • Working quickly while the shrimp is still hot, spread plenty of remoulade sauce on both sides of each French roll. Pile on the fried shrimp. Top with shredded iceberg lettuce or shredded cabbage, then add fresh sliced tomatoes and dill pickle coins.
    Serve hot with a side of potato chips and beer.

Filed Under: Bites and Tastes, Main Dishes

The Only Pizza Dough You’ll Ever Need

January 2, 2021 by How Did You Cook That

Best Pizza Dough Ever

Homemade pizza dough has always kind of eluded me. Hard crust outside, soggy inside. Too much flour on the bottom of the crust or cornmeal that leaves it strangely crunchy. Dough that’s hard to work with and ends up with holes or sticking to the pizza pan. I’ve tried and moved on more times than I care to admit.

Through trial and error and repeating mistakes, I finally landed on pizza dough that I can live a long happy life with. This is an adapted version of Roberta’s pizza dough from the famed Italian pizzeria in Brooklyn, NY.  The last time I ate Roberta’s pizza was 8 years ago during a trip to NYC. Seriously, that’s how long I’ve been on a quest to make the perfect dough. When all I had to do was use the recipe from the place. Stubborn, yeah, I already said that to myself.

Well, if you’re still searching, let me save you a little time. Just make this dough and enjoy brighter days filling your pizza with fresh pizza sauce and ingredients that will shine atop this chewy, crispy pizza crust. A little yeast, flour and olive oil is all it takes to make the best homemade pizza dough you’ll ever need. Let’s get to baking!

Print Pin

The Only Pizza Dough You'll Ever Need

A little yeast, flour and olive oil is all it takes to make the best homemade pizza dough you'll ever need.
Course Breakfast, Dinner, Lunch
Cuisine American, Italian
Keyword Baking, Pizza
Prep Time 3 hours hours 15 minutes minutes
Cook Time 15 minutes minutes
Servings 4 people

Equipment

  • Kitchen scale - Important for this recipe to turn out perfect every time
  • "00" Flour - worth the extra effort to keep "00" flour on hand in your pantry
  • Pizza stone

Ingredients

  • 153 grams "00" Flour If you absolutely do not have "00" in your pantry you can make this with all-purpose flour. Just be sure to order some before your next go of it. It makes a noticeable difference in texture and taste.
  • 153 grams all-purpose flour
  • 8 grams sea salt
  • 2 grams active dry yeast
  • 4 grams extra virgin olive oil

Instructions

  • Begin making this dough 3-4 hours before you want to eat a pizza.
  • Combine flours and salt in a large mixing bowl.
  • In a separate mixing bowl, stir together 200 grams of lukewarm (110° - 114°) tap water, the yeast and the olive oil. The water temperature does matter here. Too hot and you will kill the yeast. Too cold and you will not get the yeast to react. Then pour the yeast mixture into flour mixture. Knead, in the bowl, with your hands until well combined, approximately 3 minutes. It'll be a slightly sticky.
    (Tip: I use a deep 12 qt Cambro serving container for this job because it's easy to get my hand around the dough. But any large mixing bowl will do the trick.) The kneaded dough will be a bit sticky.
    Let the mixture rest for 15 minutes.
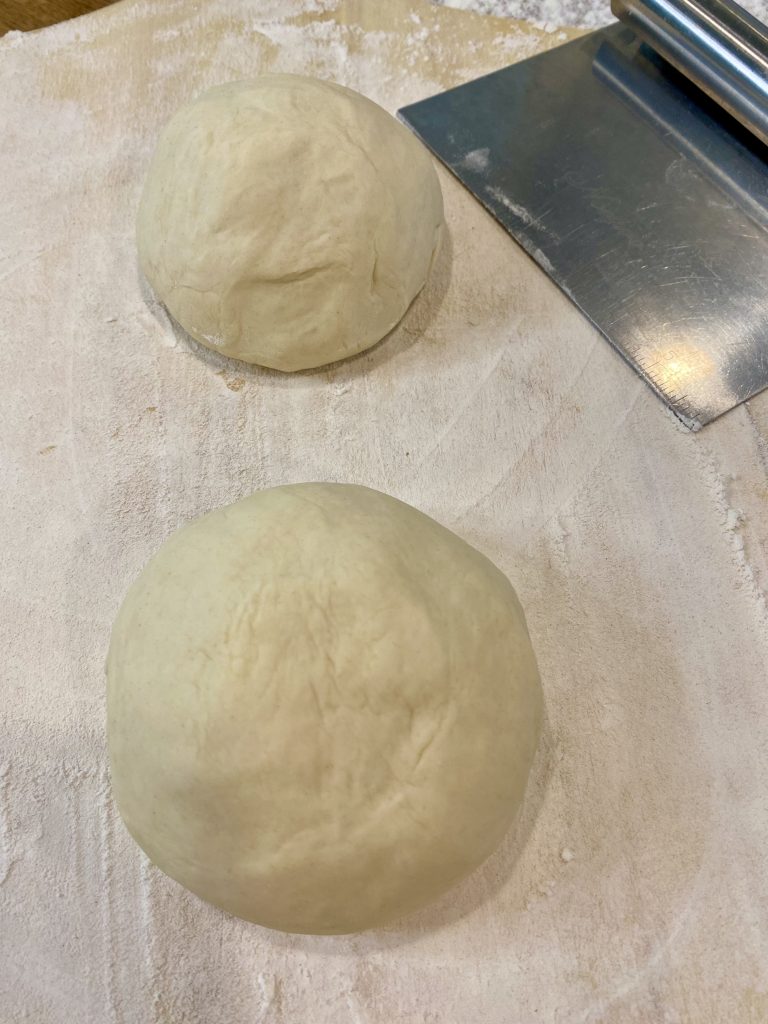
  • After the 15 minute rest, knead the dough for another 3 minutes. It should look smooth and be strong. Cut (not ripping or tearing) dough into 2 equal pieces and shape each into a ball with your hands. Place on a heavily floured surface and cover with dampened cloth. A dampened cloth should help prevent or lessen a crust that wants to form on the rising dough.
    Let dough rest and rise for 3 to 4 hours at room temperature or for 8 to 24 hours in the refrigerator. (If you refrigerate the dough, remove it 30 to 45 minutes before you begin to shape it for pizza.)
  • When you're ready to make pizza, put a pizza stone or large cast iron skillet in the oven and pre-heat to 500°. About 30 minutes to be sure that your stone or skillet are blazing hot.
    Place each dough ball on a heavily floured surface or pizza peel and use your fingers to stretch it, then your hands to shape it into rounds.
  • Top with pizza sauce and your favorite toppings.
  • Slide pizza into the oven and onto the hot pizza stone. Reduce oven temperature to 450° and bake for 12 to 15 minutes or until crust is golden brown.

Filed Under: Baking, Main Dishes, Vegetarian

Pizzeria Style Pizza Sauce

January 2, 2021 by How Did You Cook That

Pizzeria Style Pizza Sauce

I used to pick up a jar of ready-made pizza sauce from the market to keep in the pantry. You know, for the day you’re craving a slice, or two, and delivery just seems like too much. Then roll out some store bought dough, spoon on the jar of sauce and sprinkle the mozzarella. Easy. And just about as meh as that delivery idea you had.

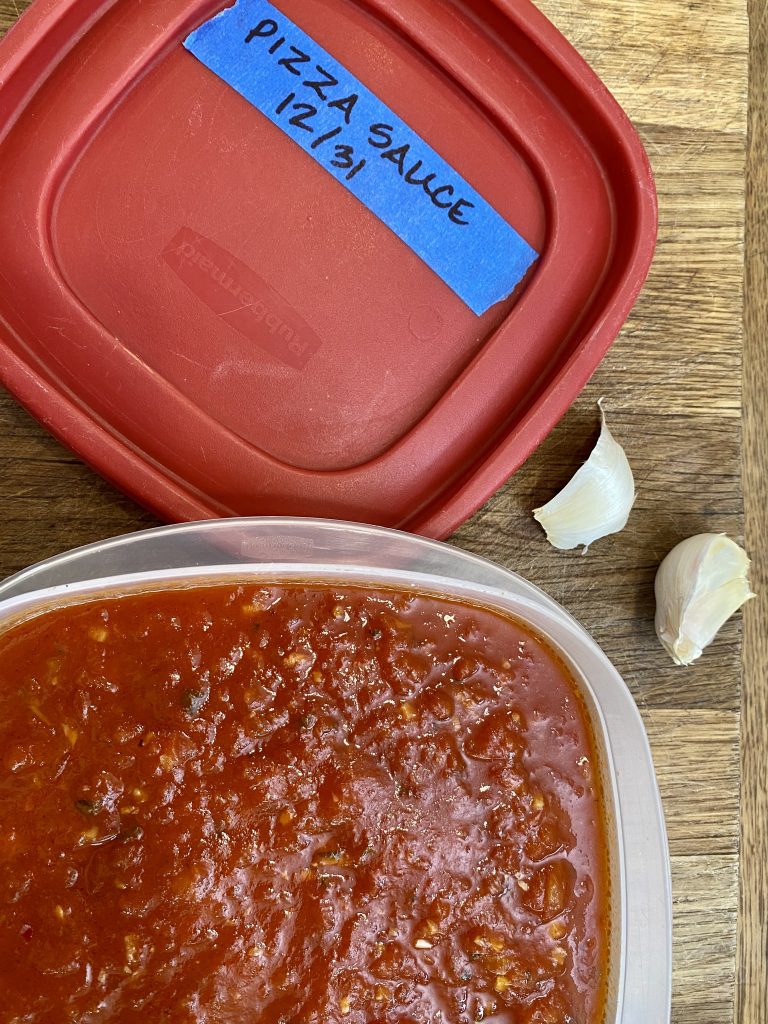
Enter an easy alternative that, once you try, you’ll never go back from. This pizzeria style pizza sauce is so good! It’s slightly sweet, smells heavenly and is seasoned with only 5 fresh ingredients. Oregano, basil, garlic, onion, and red pepper flakes. Add tomatoes and you’re all done. You can use fresh tomatoes if you’re craving in the summertime or canned tomatoes the other nine months of the year.

Pizzeria Style Pizza Sauce
Print Pin

Pizzeria Style Pizza Sauce

A slightly sweet pizza sauce seasoned with only 5 fresh ingredients. Oregano, basil, garlic, onion, and red pepper flakes. Add tomatoes and you're all done.
Course Main Course
Cuisine American, Italian
Keyword Homemade, Pizza, sauce
Prep Time 5 minutes minutes
Cook Time 1 hour hour
Servings 8 pizzas

Ingredients

  • 28 ounce canned whole, peeled tomatoes I have tried all kinds of tomatoes for this sauce. Whole are the VERY best here but if you have diced or fresh, go ahead and try them. No need to make a mad dash to the store...you might as well order the meh take-out at that point.
  • 1 medium whole yellow or brown onion peeled and quartered
  • 4 cloves garlic cloves finely chopped
  • 2 sprigs fresh oregano finely chopped
  • 2 sprigs fresh basil on stems do not remove leaves or chop
  • 1 tsp red pepper flakes

Instructions

  • Pour the can of tomatoes and juice into a food processor with blade attachment. Pulse until pureed but still just a teeny bit chunky. Add oregano and garlic and pulse another couple of times.
  • Pour tomato mixture into a medium saucepan. Add quartered onion. Do not chop. Just leave it in big chunks. The onion adds flavor to your sauce and you will discard it at the end. Do the same with the basil stems. Do not chop. They will simmer with the sauce and you will discard them at the end. Toss in red pepper flakes. Turn heat to medium low and bring sauce to a simmer.
  • Once it begins to simmer turn to low and place a lid slightly ajar over the top to keep splatters to a minimum. Simmer for about an hour or until sauce is reduced by about ⅓.
  • Remove from heat. Discard onion pieces and basil sprigs. Cool. Use immediately or save in the refrigerator for 2 weeks. You can also freeze any extra. It will keep for 3 months in the freezer.

Filed Under: Main Dishes, Sauces, Vegetarian

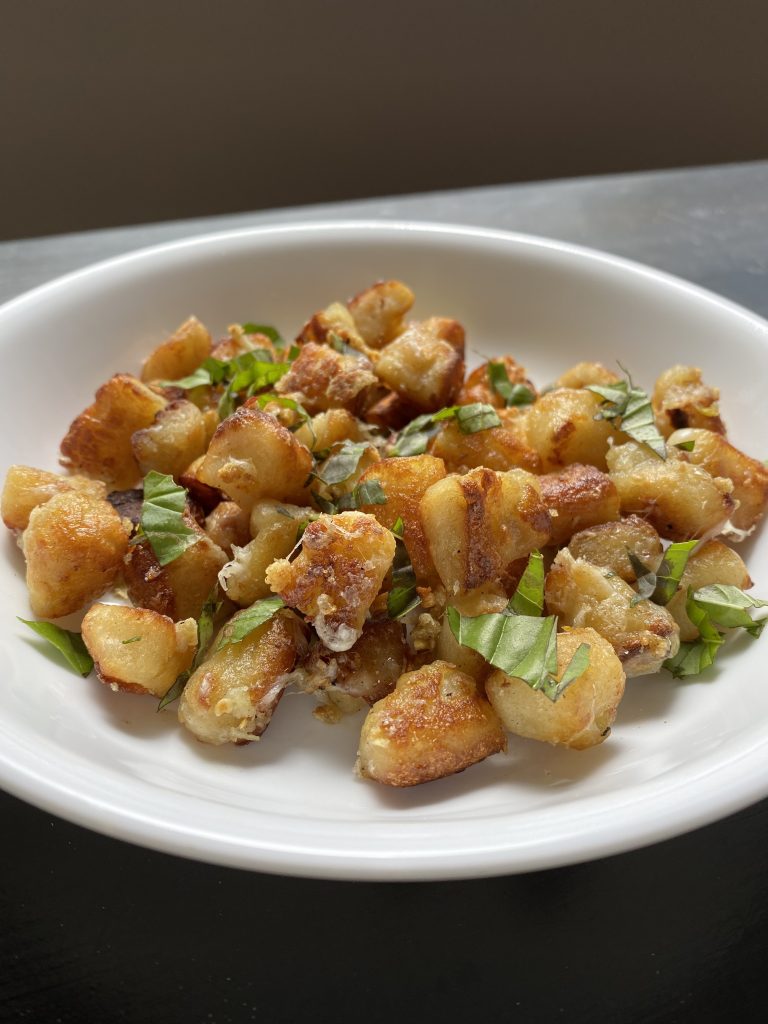
Homemade Gnocchi with Garlic and Parmesan

June 8, 2020 by How Did You Cook That

Homemade Gnocchi

Holy cow, you can make your own gnocchi at home? I once thought those deliciously chewy balls of pasta came from a bag at the store. When I heard that I could make them easily at home with potatoes and some flour I was skeptical but willing. Homemade gnocchi with garlic and Parmesan takes this pasta to a whole new level.

My first attempt was pretty rustic looking but absolutely delicious! I’m improving my form but the flavor of these little nuggets of pasta is out of this world, no matter what they look like. Be patient and keep at it. The process is WAY easier than you can imagine. And in just an hour this recipe serves up a delicious pasta dish that you can honestly proclaim, “I did it myself”.

For this particular dish I cooked the gnocchi first. Then fried it with garlic butter and sprinkled it with Parmesan and fresh chopped basil. You can toss your gnocchi with homemade pesto or fresh tomato sauce and olive oil. Whatever floats your boat. Homemade gnocchi is sturdy, starchy and pairs well with just about any sauce you can dream up.

I don’t have a potato ricer. Instead I use a hand masher to mash up the potatoes really well. If any large pieces are left behind I just pick them out. I also bake my potatoes with the skin on rather than boiling them. I find that this keeps them from having too much moisture in them. You can also press the baked potatoes through a sieve.

Homemade Gnocchi
Print Pin

Homemade Gnocchi with Garlic and Parmesan

In just an hour serve up a delicious skillet of gnocchi that can be served with pasta sauce, olive oil or fried with butter and garlic.
Course Dinner, Lunch
Keyword Homemade, Pasta
Servings 4

Ingredients

  • 1 pound Russet or Yukon Gold potatoes scrubbed with skin on
  • 1 cup AP or 00 flour
  • 1 tsp Kosher salt

Instructions

Make the Gnocchi

  • Preheat oven to 400°.
  • Scrub potatoes and bake for 30 minutes or until soft when pierced with a fork.
  • Remove from oven and let cool just enough to peel. After peeling potatoes begin working with them immediately so that they do not become sticky.
  • Pass potatoes through a potato ricer or mash, mash, mash with a hand masher. Remove large pieces. A sieve will work for this process too.
  • Mix together the flour and salt and place on a flat work surface. Make a well in the middle and add the potatoes. Then add the egg. Mix together with your fingers to form a soft dough. It should not stick to your fingers. Add more flour if necessary.
  • On a lightly floured surface, cut small amounts of dough to form ropes and cut into 3/4 inch pieces.
    Homemade Gnocchi
  • Slide a fork along each piece and gently squeeze. Gently.
  • Sprinkle with a little bit of flour and toss, so they don't stick together. Let the gnocchi rest for 20 minutes.
  • Heat a large pot of salted water to boiling. After gnocchi has rested 20 minutes drop pieces, in batches, into the boiling water. As soon as they float they are done. Remove them to a colander. Continue until all are cooked.
  • Potato gnocchi can be left uncooked and covered for no more than a couple of hours. Cooking may take a little longer once they have dried out a bit in the air.
    Gnocchi can also be frozen. Place uncooked gnocchi on a cookie sheet in the freezer. Leave for approximately 20 minutes then seal them in an airtight freezer bag. They will keep for about 1 month.
    When you cook them do not defrost, just add them to boiling salted water.

Garlic and Parmesan Stir Fry

  • In a large skillet heat butter until melted and bubbling but not browned. Turn down heat and add garlic. Stir for 45 seconds to cook garlic but do not brown it. Remove garlic from skillet leaving butter in the skillet.
  • Turn heat on skillet up to medium high. Add enough gnocchi to cover the bottom of skillet and fry in garlic butter, turning each piece until golden and crisp. Sprinkle with finely grated Parmesan cheese and give gnocchi one more stir to coat.
  • Remove to plates, season with salt and pepper to taste and sprinkle with fresh chopped basil.

Filed Under: Main Dishes

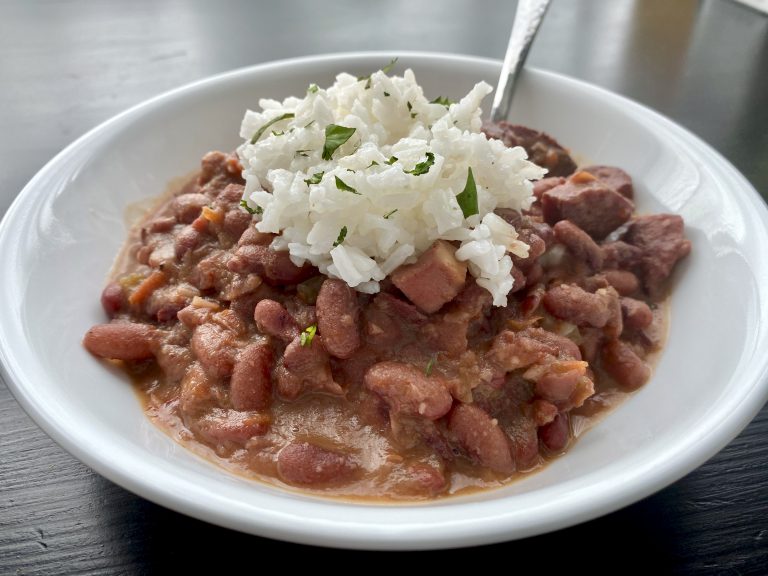
Creamy Red Beans and Rice

May 31, 2020 by How Did You Cook That

Southern Red Beans and Rice

The cookbook Louisiana Real and Rustic by Emeril Lagasse had a huge influence on my early cooking. I made every single recipe in that book, eager to learn everything I could about cooking. And about my new town of New Orleans. One of my very favorite southern dishes was, and still is, Red Beans and Rice.

Although southern Red Beans and Rice is traditionally served on Mondays in New Orleans, I now make it any day of the week. It’s my go to comfort food when I’m missing NOLA.

Southern Red Beans and Rice is truly the essence of Louisiana and New Orleans cooking. It is such a local staple that Louis Armstrong added, “Red Beans and Ricely Yours,” to his correspondence letters.

My red beans and rice recipe has evolved, as I learned to add more flavor and spice to my cooking. This pot of stew is rich and full of flavor. The ingredients are enough to provide plenty of leftovers throughout the week.

So pour yourself an ice cold Abita beer, turn up the volume on some Louis Armstrong, and get to cooking. 

Southern Red Beans and Rice
Print Pin

Southern Red Beans and Rice

Southern Red Beans and Rice is truly the essence of Louisiana cooking. Serve this meaty bean stew over a bowl of fluffy white rice. (Can be made vegetarian. Just leave out the meat.)
Course Dinner, Main Course
Keyword Beans, Rice
Prep Time 20 minutes minutes
Cook Time 3 hours hours
Total Time 3 hours hours 20 minutes minutes
Servings 8

Ingredients

  • 1 large yellow onion
  • 1 large red or green pepper use red bell pepper for sweeter bean flavor
  • 3-4 stalks celery
  • 4 cloves garlic minced
  • 2 Tbsp butter
  • 1 pound dried red beans I use Camellia brand red beans
  • 1 quart chicken broth
  • 2 Tbsp canola oil
  • 1 pound beef sausage link
  • 3-4 strips of bacon
  • 1 chicken breast or chicken tenders
  • 2 bay leaves
  • 1 tsp ground cayenne
  • salt and pepper to taste
  • 1-2 cups white rice

Instructions

  • Triple rinse red beans in a colander. Set aside. (You can also soak beans overnight if that is your thing.)
  • In a large stockpot over medium heat bring chicken broth to a simmer. Add red beans and reduce heat to low.
  • While beans are simmering, chop red bell pepper, onion, celery and mince the garlic. Set aside.
  • Cut beef sausage link into rounds, then cut rounds in half. Chop 3-4 slices of bacon into ½ inch pieces. Cut chicken breast into rough ½ inch pieces.
  • In a skillet over medium heat add 1 Tbsp canola oil and 1 Tbsp butter. Add chicken and cook until no longer pink. Add bacon and sausage and cook meats together until browned. Remove from skillet to a plate.
  • In the same skillet with drippings from the meats cook the onion, pepper and celery until wilted, scraping up browned bits from the bottom of the skillet. Add remaining butter and canola oil. Add the minced garlic and cook for another 30 seconds. Do not let the garlic brown.
  • Add the cooked vegetables and drippings to the pot of beans. Add meat to the pot of beans. Remove a cup of liquid from the beans and use it to deglaze the skillet, then add all the liquid back into the stock pot. Add bay leaves to the pot.
  • Bring pot to a low boil for 15 minutes then reduce heat to low and simmer for 2 hours. Add more broth or water to achieve your desired consistency for the beans.
  • After 2 hours press some of the softened beans against the sides of the pot to smash. Continue to smash the beans until the broth becomes creamy and thickened. You do not need to smash all of the beans. Just enough to achieve creaminess. Remove bay leaves. Simmer on low for another 10 minutes or so.
  • Cook 1-2 cups of rice. More or less depending on your serving needs.
  • Serve red beans in bowls over rice. Garnish with parsley or green onions.

Filed Under: Main Dishes

Creamy Sweet Potato Curry

May 29, 2020 by How Did You Cook That

Creamy Sweet Potato Curry

Creamy sweet potato curry is one of my favorite dishes. It’s the perfect comfort food to make on those nights when you are wondering what to make for dinner. This creamy curry is both vegetarian and vegan and packs a mighty punch of flavor and spice. 

A rich curry with minimal ingredients that all come together in about 20 minutes for a quick and satisfying meal. Serve creamy sweet potato curry over a bowl of steamy sticky rice. What you don’t eat tastes even better the next day and will keep for up to 5 days in the fridge.

Creamy Sweet Potato Curry
Print Pin

Creamy Sweet Potato Curry

Course Dinner, Lunch
Cuisine Global
Keyword Soup
Servings 4

Ingredients

  • 2 pounds sweet potatoes peeled and cut into ¼" cubes
  • 2 shallots halved and thinly sliced
  • 2 cloves garlic minced
  • 1 Tbsp fresh ginger minced
  • 1 Tbsp peanut oil
  • 3 cups fresh baby spinach
  • 3 Tbsp red curry paste
  • 1 14 ounce can coconut milk
  • 1 cup vegetable broth
  • ½ cup chopped peanuts divided
  • ¼ - ½ cup chopped cilantro divided
  • 1 cup rice (basmati, brown, white) cooked

Instructions

  • Cook rice and set aside for serving.
  • Heat peanut oil over medium high heat. Add the shallots and stir until soft and fragrant. Add the garlic, ginger and sweet potatoes and stir to coat with oil and minced aromatics. Add the red curry paste and stir until combined.
  • Add coconut milk and vegetable broth. Simmer over low heat for about 15 minutes until sweet potatoes are softened.
  • Add ¼ cup peanuts and a tablespoon or two of cilantro. Give it a good stir then add the spinach and cook just until wilted.
  • Remove from stove and serve in bowls over rice. Sprinkle on remaining peanuts and cilantro to taste.

Filed Under: Main Dishes, Vegetarian

  • Page 1
  • Page 2
  • Page 3
  • Go to Next Page »

Primary Sidebar

Hi food lovers. Welcome to my kitchen.

If you're looking for simple dishes made with wholesome, seasonal ingredients, you've come to the right place. Grab a fork and take a bite. Dig In →

Coriander Seeds
Strawberry Rhubarb Galette
Coconut Peach Popsicles

Categories

Favorite Resources

Cook Books

What’s New

  • Roasted Garlic Tomatoes with Thyme
  • Crisp Green Salad with Sweet Honey Vinaigrette
  • Number One Ice Cream
  • Street Corn Soup
  • Egg In A Jar

Footer

  • Email
  • Facebook
  • Instagram
  • YouTube

Find Recipes

Never Miss a Recipe

Copyright © 2025 How Did You Cook That on the Foodie Pro Theme