• Skip to primary navigation
  • Skip to main content
  • Skip to primary sidebar
  • Skip to footer

How Did You Cook That

  • Recipes
    • Main Dishes
      • Street Corn Soup
      • Maple Ginger Chicken and Asparagus
      • Homemade Gnocchi with Garlic and Parmesan
      • Loaded Baked Potato Soup
      • Beef Bourguignon
      • Grilled Salmon Tacos
      • Thai Inspired Shrimp Curry Soup
      • Chicken and Sausage Gumbo
      • Cast Iron Skillet Pizza
        • Vegetarian
          • Creamy Sweet Potato Curry
          • Pan Tossed Vegetarian Noodles
          • Zucchini & Mushroom Bucatini
          • Stir Fried Baby Bok Choy
          • Roasted Red Pepper and Tomato Soup
          • Potato Leek Soup
          • Portobello “Steak” and Potatoes
          • Cheesy Cauliflower & Carrot Soup
    • Companions
      • Roasted Garlic Tomatoes with Thyme
      • Crisp Green Salad with Sweet Honey Vinaigrette
      • Zucchini Fritters
      • Easy Flat Bread
      • Animal Style French Fries (Copy Cat Version)
      • Cheesy Jalapeno Cornbread
      • Buffalo Cauliflower Bites
    • Breakfast
      • Chilaquiles Rojos with Eggs
      • Sour Cream and Onion Biscuits
      • Dutch Baby with Blueberries
      • Blueberry Lemon Muffins with Streusel Topping
      • Egg In A Jar
      • Creamy Acai Bowls
      • Baked Irish Oats with Cream
      • Fluffy Buttermilk Pancakes
      • Original French Crepes
      • Vanilla Spiced Overnight Oats
      • Seriously Delicious Waffles
      • Southern Buttermilk Biscuits
    • Sauces
      • Creamy Thousand Island Dressing
      • Spicy Mango Salsa
      • Favorite Avocado Recipes
      • Loquat Marmalade
      • Adobo Chile Aioli
    • Desserts
      • Number One Ice Cream
      • Loaded Trail Mix Cookies
      • Toasted Candied Pecans
      • Angel Food Loaf Cake
      • Easy Banana Zucchini Bread
      • Triple Chocolate Cake with Whipped Ganache Frosting
      • Key Lime Cheesecake
      • Cinnamon Sour Cream Coffee Cake
      • Zach’s Chocolate Chip Cookies
      • Strawberry Rhubarb Galette
      • Spiced Cheesecake
      • Berry Fruit Crumble
      • Banana Cinnamon Crunch Bread
    • Thirst Quenchers
      • The Forager Cocktail
      • Cucumber Cilantro Gin Tonic
      • Sunrise Glow Smoothie
      • Three Day Ginger Beer
  • Experiences
    • Los Angeles Pop Ups – Zoe Food Party
    • Los Angeles Bread Crawl
    • The Great Outdoors (A Basic Pantry List)
  • Food Muse
    • A Note About Sugar
    • No More Plastic!
    • Best Buttermilk Substitutions
    • Prepping and Storing Cilantro
    • Home Roasted Coffee
  • Sugar Loaf
    • How to Feed a Sourdough Starter
    • Sourdough Pancakes
    • Sourdough Country Bread Loaf
  • About
  • Navigation Menu: Social Icons

    • Facebook
    • Instagram

Companions

Roasted Garlic Tomatoes with Thyme

July 29, 2021 by How Did You Cook That

Fresh summer tomatoes don’t last forever. But there are a few tricks and tips to keep them around for most of the fall and winter.

Last year I bought Alison Roman’s book, Dining In. It’s a great cookbook. Especially for those of us with small kitchens. In the book she has this fabulous recipe for slow roasting vine-ripened tomatoes for her Roasted Tomato and Anchovy Bucatini. I now use a variation of her recipe when I have an abundance of fresh tomatoes. They keep in the freezer for up to 6 months. Mine never last that long. I eat ’em up waaaayyyy before that.

Try this recipe on for size and keep enjoying your harvest of summer tomatoes all autumn long.

Roasted Garlic Tomatoes
Print Pin

Roasted Garlic Tomatoes with Thyme

Slow roasted tomatoes seasoned in a confit of garlic, thyme and olive oil.
Course Dinner, Lunch, Snack
Keyword Roasting, Tomatoes, Vegetables
Total Time 3 hours hours
Servings 4

Ingredients

  • 5 lbs small vine-ripened tomatoes (or as many as you have;)
  • ½ cup olive oil
  • 5 large garlic cloves, minced
  • ¼ cup fresh thyme, stripped from stems
  • Kosher salt
  • ground black pepper

Instructions

  • Preheat oven to 225°.
  • Rinse tomatoes, remove stems and cut in half through the middle.
  • Lay tomatoes, cut side up, side by side on a baking sheet. You may need a few baking sheets for this project.
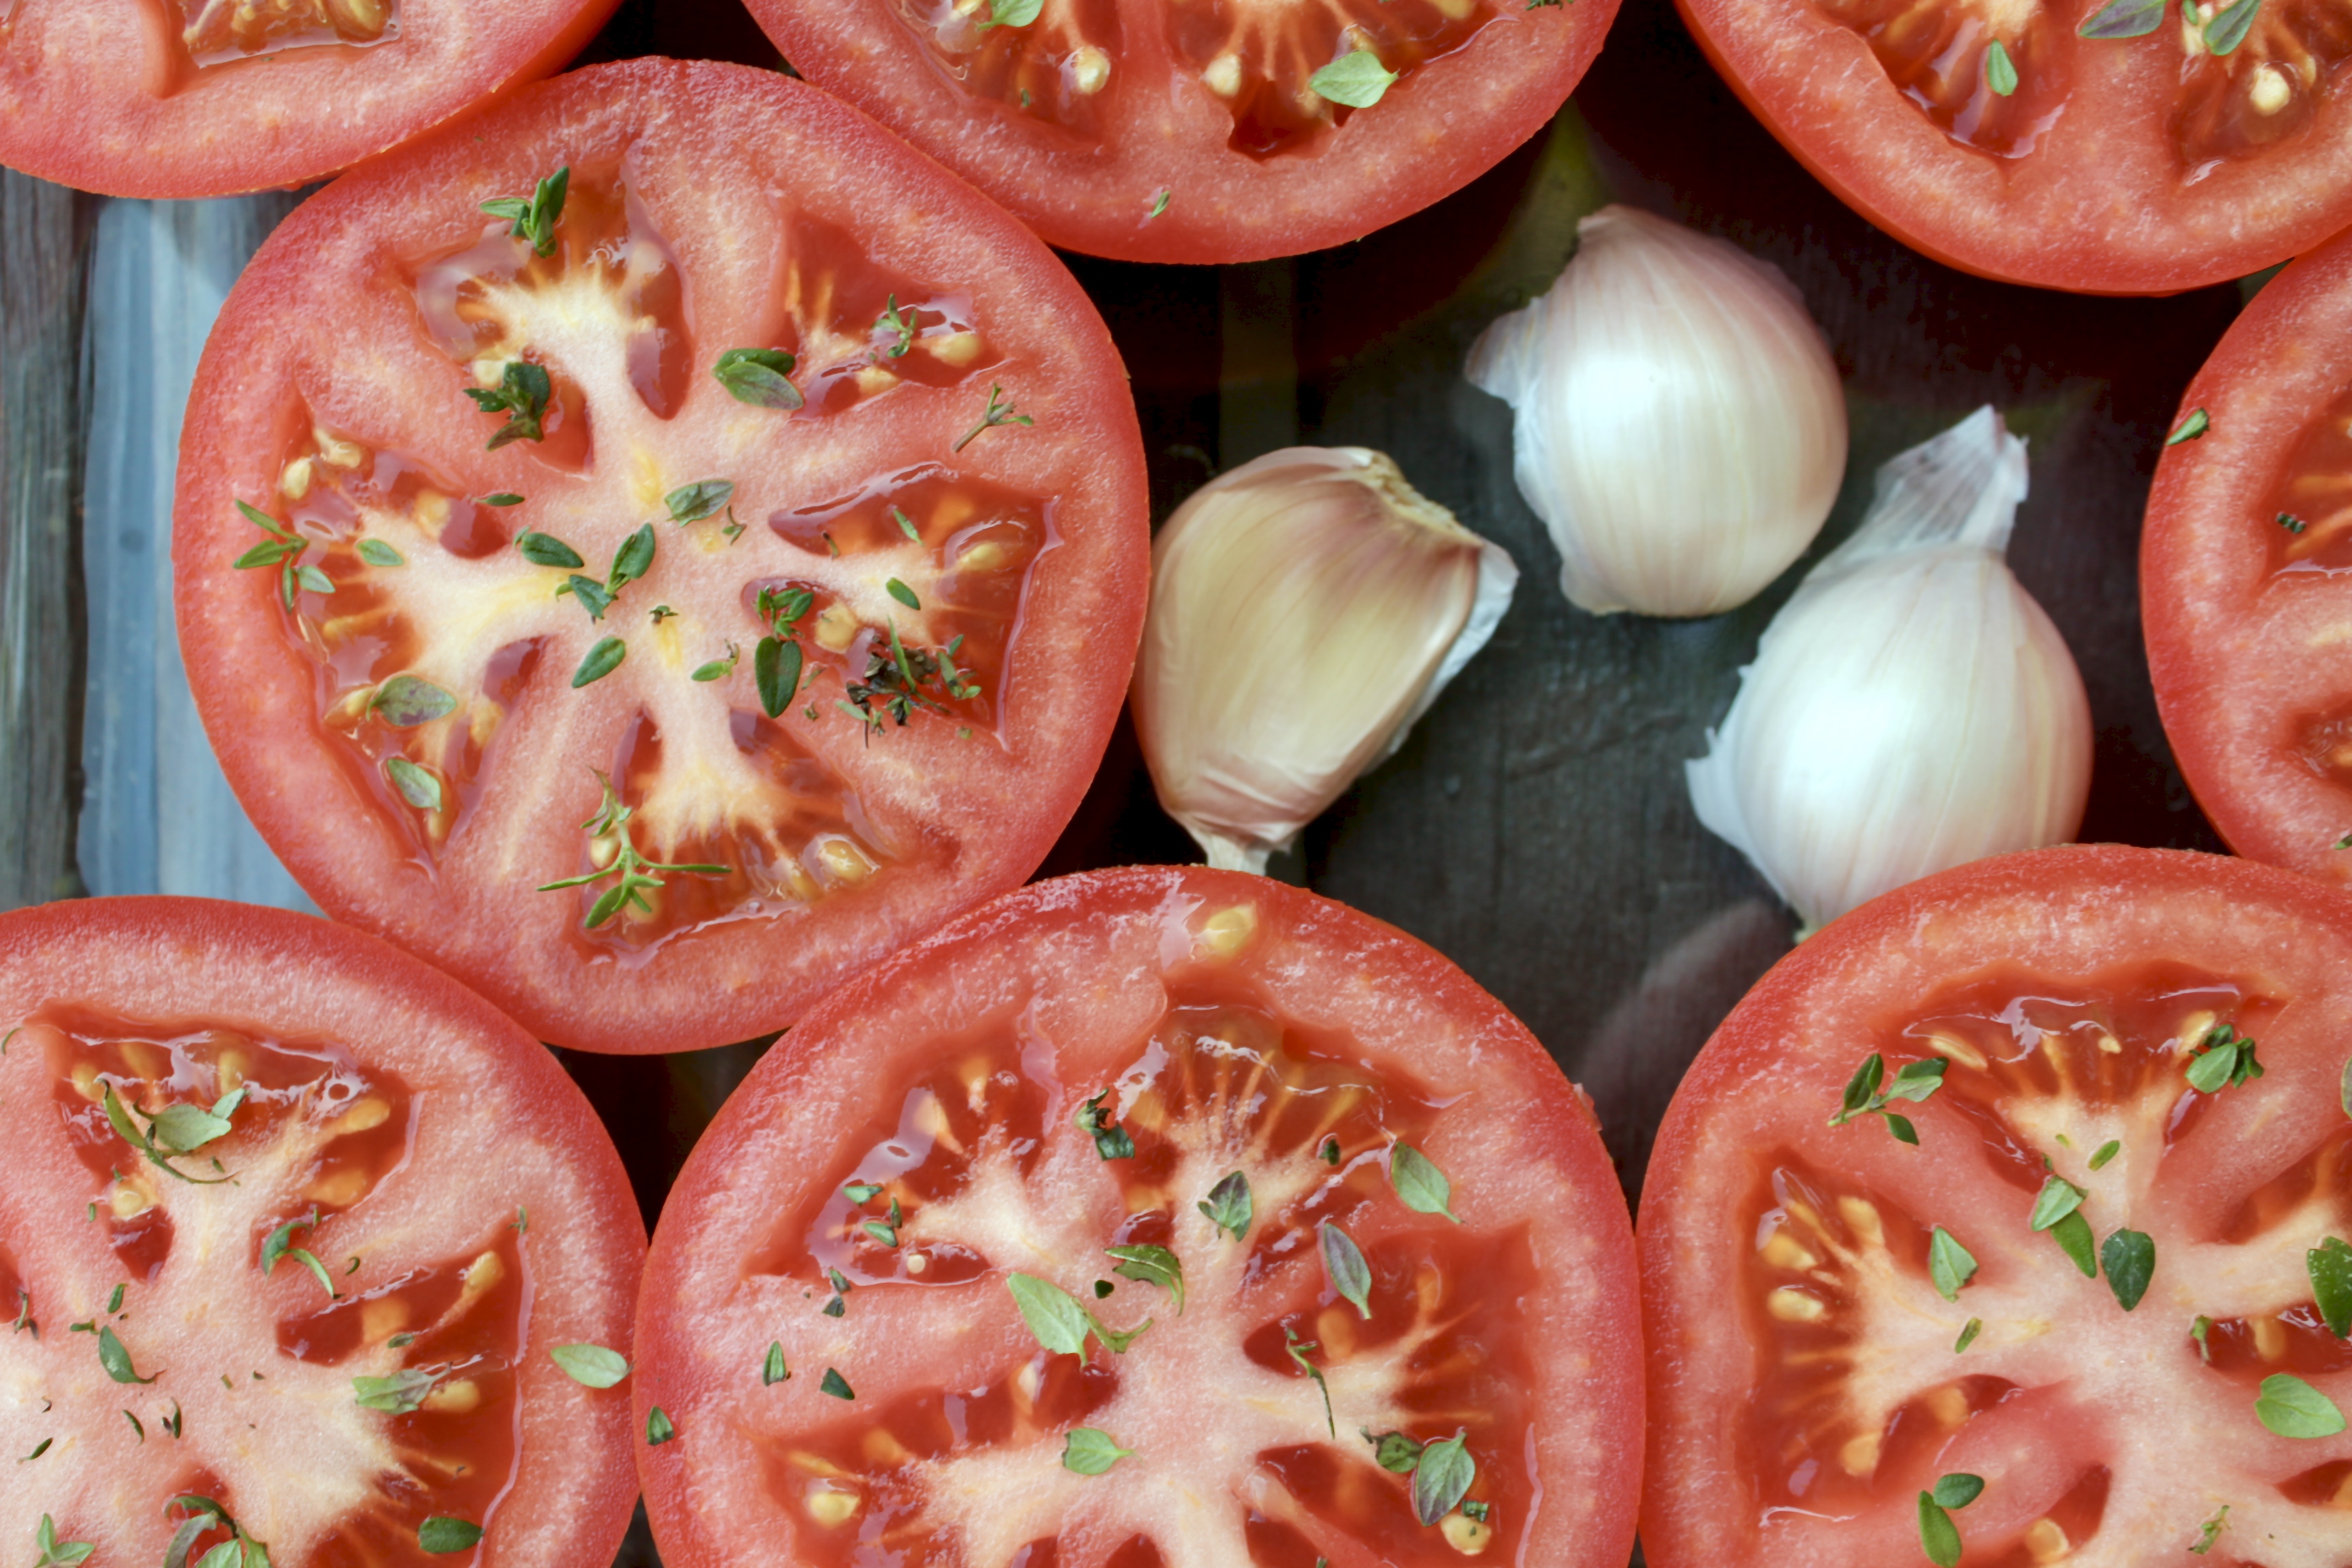
    Tomatoes and Garlic
  • Drizzle tomatoes with olive oil. It will flow down and fill the baking sheet.
  • Evenly distribute garlic and thyme among each of the tomatoes, sprinkling over the tops. Season generously with salt and pepper.
  • Roast in the oven for 2½-3 hours, rotating the baking sheets every hour. The tomatoes with shrivel up and your house will smell like heaven. (Be sure to turn on your oven vent.)
  • Remove from oven. Use immediately.
  • If freezing, allow to completely cool. Divide evenly into freezer safe storage containers, making sure to pour the olive oil and any bits of thyme in with each group of tomatoes. The oil is what makes these little roasters shine. Put the date on the containers and freeze.
  • Roasted tomatoes keep in the freezer for up to 6 months.

Filed Under: Bites and Tastes, Companions, Sauces

Crisp Green Salad with Sweet Honey Vinaigrette

July 27, 2021 by How Did You Cook That

Citrus Salad

Simple green salads with fresh fruit look so beautiful and taste divine. This fresh crisp salad is no exception. Here are a couple of tricks to add to your arsenal that’ll ensure your salad is bright and super tasty.

Most importantly, you gotta get the dressing into all the right places without weighing down the fresh fruits and lettuces. In order to do this just layer and drizzle, layer and drizzle. No tossing of this salad.

You can make this salad with or without berries. The real magic here is in the prep. For example, each leaf of lettuce gets washed and brown ends removed. It may seem like a tedious step but it yields an amazing salad.

The vinaigrette had just a simple few ingredients that you probably have on hand in your pantry. When added all together your salad will scream, “eat me now!”

Green Salad
Print Pin

Crisp Green Salad with Sweet Honey Vinaigrette

Crisp green salad with sweet honey vinaigrette. Make it with or without fresh fruit.
Course Main Course, Side Dish
Keyword Salad, vegan, Vinaigrette
Total Time 20 minutes minutes
Servings 4

Ingredients

Lettuces

  • 2 heads butter bibb lettuce organic
  • 2 large Belgian endive organic
  • 1 Romaine heart organic
  • 1 large grapefruit, peeled, sectioned and cut into ½ inch pieces (optional)
  • 1 pint fresh berries (optional)
  • ideas for added fruit: fresh peaches, avocado, apple (optional)

Vinaigrette

  • 1 large shallot, minced can use a red onion if shallots are not available
  • 2½ Tbsp sherry vinegar
  • 1 Tbsp Dijon mustard
  • pinch red chile flakes
  • 1 Tbsp warm water
  • ¾ cup extra virgin olive oil
  • 1 Tbsp honey
  • 2 sprigs fresh thyme, stripped
  • 1 large clove garlic, grated
  • Kosher salt and ground black pepper

Instructions

  • IMPORTANT: How to wash the lettuces. This step is important to wash off any residual soil or possible contaminants used in packaging. Trust me, you'll notice the difference.
    Fill a large bowl with lukewarm water. Remove wilted and browned leaves from the lettuces.
    Trim each head at the root. Leave butter-lettuce leaves whole. Cut large leaves of romaine and endive in half, then drop into water. Swirl lettuces in water, then drain. Fill bowl again with clean cool water and wash twice more. Rinse one more time with cold water, then transfer to a salad spinner to dry. Gently wrap in paper towels or clean dish towels. Set aside.
  • Rinse minced shallot with cold water. Drain, then place in a medium bowl. Add vinegar and warm water. Let sit for 2 minutes, then whisk in oil, mustard, honey, thyme, garlic and a large pinch of salt. Taste, and adjust salt and vinegar as needed.
  • In a large salad bowl carefully pile a generous handful of the washed lettuces. Add fruit (if using) Sprinkle with salt and pepper. Add a generous drizzle of vinaigrette. Add another handful of salad, more fruit (if using) salt, pepper and vinaigrette. Repeat until lettuces (and fruit) are all in the bowl. Add another drizzle of dressing.
    Serve.
    This salad is best fresh. Be sure to make it just before serving.

Filed Under: Bites and Tastes, Companions, Vegetarian

Seasoned Black Beans

March 2, 2021 by How Did You Cook That

Seasoned Black Beans
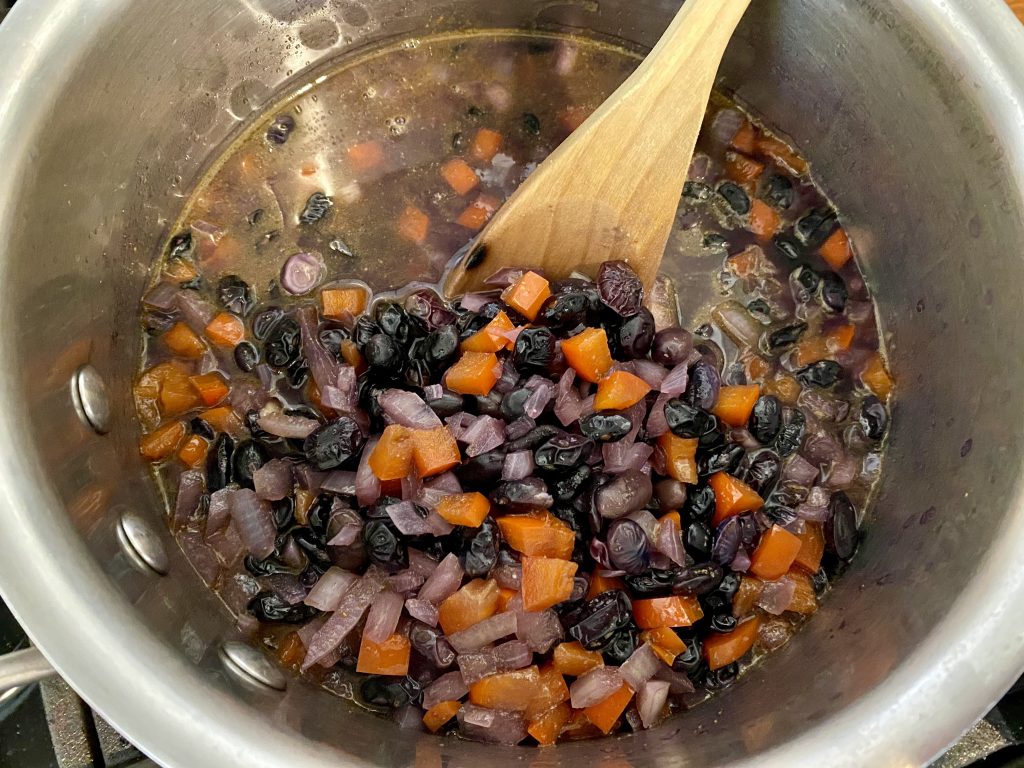
You know those cans of seasoned or Cuban style black beans at the grocery store? I used to buy those beans to keep on hand for a rainy day, but no more!  Slow-cooking dried black beans is one of the best changes I ever made to my pantry. Simmering on the stove, they soak up the savory flavors of onions, sweet red peppers and cilantro. Delicious!
 
Slow-cooking black beans allows them to develop a rich and savory flavor. Use these creamy black beans for soups, tacos, burritos, or anything you can imagine to go with beans. You can even mash them and recook them to make refried black beans. They are so versatile and once you try them, you’ll never look at those canned beans in the same way again.
Seasoned Black Beans
Print Pin

Seasoned Black Beans

Course Dinner, Side Dish
Cuisine American, Mexican
Keyword Beans
Prep Time 10 minutes minutes
Cook Time 2 hours hours
Servings 6

Ingredients

  • 2 cups small dried black beans
  • 4 cups vegetable broth chicken broth works fine too
  • 1 small red bell pepper chopped
  • 1 small yellow onion chopped
  • 2 Tbsp olive oil
  • ⅛ cup fresh cilantro finely chopped
  • 2 tsp salt
  • 1 tsp ground black pepper
  • 1½ tsp cumin
  • ½ tsp cayenne

Instructions

  • Rinse black beans. Set aside to drain.
  • In a medium saucepan heat olive oil and saute red peppers and onions until translucent.
  • *** If you make these beans in a crock-pot, add the sauteed vegetables to the crock pot and then add the rest of the ingredients.
  • Pour in vegetable broth and rinsed black beans.
  • Season with cumin, salt, pepper and cayenne.
  • Bring to a low boil then turn down heat to low. Allow beans to simmer for about an hour, stirring to make sure the beans don't stick to the bottom of the pan. Add water or more vegetable broth as needed to keep the beans nice and brothy.
  • At 1 hour add the chopped cilantro and season to taste. Simmer for another hour or until beans are soft and creamy.
  • Eat immediately or refrigerate up to 1 week.
    Beans can also be frozen for up to 3 months. Transfer the cooled and cooked beans, with the broth, to a freezer-safe bag or re-usable storage container. Remove as much air as possible.
    When freezing, consider separating beans into single serving sizes and write the date on the container.

Filed Under: Breakfast, Companions, Vegetarian

Homemade Corn Tortillas

February 26, 2021 by How Did You Cook That

Homemade Corn Tortillas

It’s Easy. Really.

If you learned one kitchen skill to change all your Mexican food recipes, this would be it. Homemade corn tortillas, made from scratch. And it’s so much easier than you might think.  Once you learn this very easy recipe you’ll rarely buy tortillas from the end cap at the grocery store again.

Take the plunge and buy a cast iron tortilla press. You’ll be happy you have it. For around $20 it’s a small tool and you can tuck it away in the bottom of your pantry. I use an 8″ Victoria brand tortilla press and line it with a zip top bag. (Wash the plastic bag to re-use for the next batch of tortillas.)

Downsizing

Walking through the grocery store last week I noticed that my cart was more empty than it has ever been. No more need to pick up bread, pasta or tortillas. Over the years I’ve learned to bake bread and English muffins.  I make pasta of all kinds, and pizza dough too. And using this recipe I mix up homemade tortillas in no time at all.

Having a good supply of organic flour and corn masa at the ready means you can put together dinner easily without making a last minute dash to the grocery store. I have a very small Los Angeles kitchen which means not a lot of room for gadgets and extra tools. And honestly, you don’t need ’em for this.

Be a little patient. If they aren’t just right the first time around, I promise, you’ll get it. Understanding the best consistency of the dough comes quickly. You’ll know you’ve got it right when the dough feels like Play-Do and doesn’t stick to your hands. The press takes a little getting used to but lining it with a zip top bag will make the job sooo much easier.

Tip: Cut off the zipper of a zip top bag then slice down the two sides of the bag so that it opens like a book. Lay the bag inside the press, open, set your ball of dough on the open bag, close it, press, open and toss the flattened dough on the griddle.

I hope you will try this recipe and discover the convenience of making your own homemade corn tortillas.

Homemade Corn Tortillas
Print Pin

Homemade Corn Tortillas

Course Appetizer, Dinner, Lunch
Cuisine Mexican
Keyword Bread, Tortillas
Prep Time 15 minutes minutes
Cook Time 10 minutes minutes
Servings 20 tortillas

Equipment

  • Cast iron tortilla press
  • Zip top bag

Ingredients

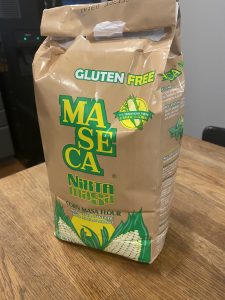
  • 2 cups 2 cups masa harina Make sure to buy Nixta Masa. NOT INSTANT. It's fairly readily available in grocery stores throughout the US and always available in Latin grocery stores.
  • 1 tsp kosher salt
  • 1 ½ cup hot water not boiling (about 120°)

Instructions

  • Cut the sides of a zip top bag along the seams. Leave the bottom seam uncut. Cut off the zipper. The bag should now open and close from the bottom seam, like a book. Lay the bag inside of your tortilla press until ready to use.
    Tortilla press
  • Combine masa harina and salt in a large mixing bowl.
    Masa Harina
  • Add 1½ cups hot water and stir till it just comes together but still has dry corn flour. Then ditch the spoon and get your hands in there. Knead the dough, squeezing, pressing down with the heel of your palm, then folding over. Knead for 3 minutes. Cover bowl with a damp tea towel and let it rest for 5 minutes.
  • After 5 minutes knead the dough again for about 3 more minutes. The dough should not stick to your hands. It should feel like play-do or that magic sand stuff that kids play with.
  • Break off pieces of dough and roll into ping pong sized balls.
  • Heat a griddle or flat skillet till very hot. Add a couple drops of canola oil to the skillet and brush around to evenly coat.
  • Use a cast iron tortilla press to get the most consistently even and perfectly round tortillas.
  • Heat a griddle or flat skillet till very hot. Add a couple drops of canola oil to the skillet and brush around to evenly coat.
  • Lay the cut zip top bag inside the tortilla press. Open it like a book and place one of the balls of dough on the bag. Fold the bag over onto the dough ball and then press the ball with the iron press. Open the press and lift out the flattened dough, open the bag and peel off into your hand. Then lay the tortilla on the hot skillet.
  • Heat for about 1 minute until golden brown spots form on the bottom of the tortilla. Flip it and do the same on the other side. Remove from griddle and keep warm in a tortilla warmer or wrap up in a clean tea towel. Fold the towel over each tortilla so they are all wrapped up inside but not stacked on top of each other. When the towel is full, start another.
  • Use tortillas immediately while still warm or store them in a sealed plastic bag in the refrigerator for up to 3 days. Around my house any leftover tortillas get eaten within a day so I just leave them on the counter wrapped in the towel and everybody can grab 'em when the craving hits.

Filed Under: Companions, Tips

Garlic Baked Potato Wedges

February 11, 2021 by How Did You Cook That

Garlic Baked Potato Wedges

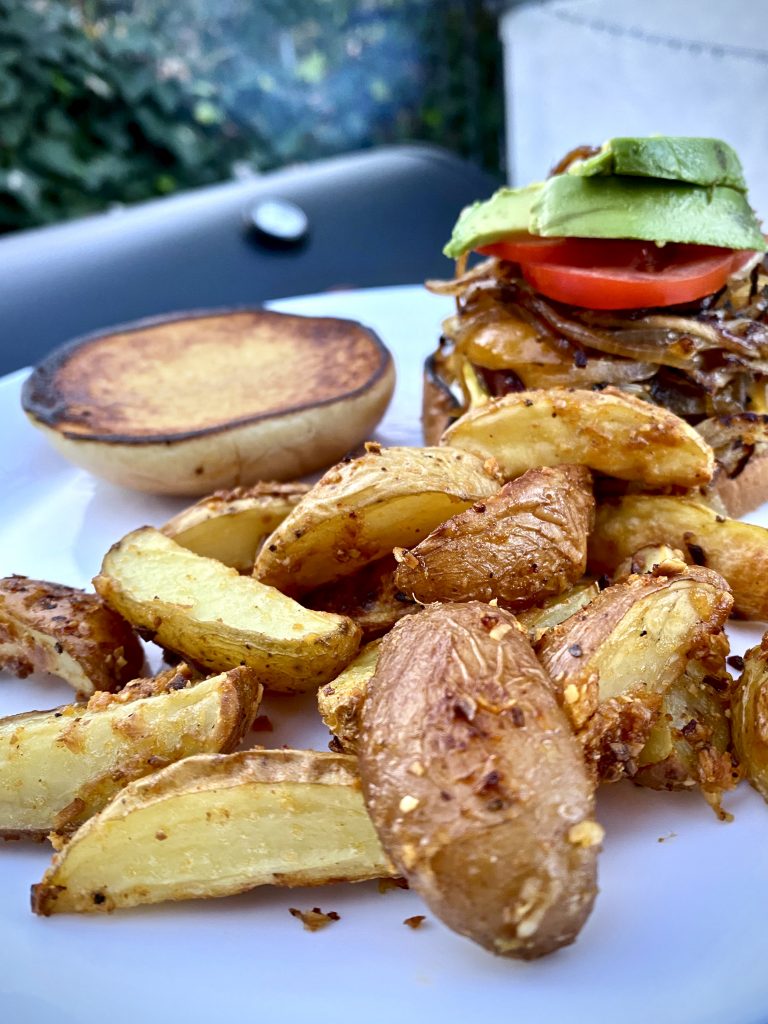
Crispy on the outside, soft and creamy on the inside, Garlic Baked Potato Wedges are a prefect side for all things BBQ.  I bake these wedges so they turn out crispy and garlicky with no trace of oily paper towels or fingers. So, the only thing sticking to your fingers will be the sauces you bring to the table for dipping.

Goodbye frozen, store-bought potato wedges. These easy garlic baked potato wedges can be tossed together using ingredients you probably already have in your kitchen. Then pile on the garlic for an added spicy kick.  Plus Parmesan cheese for…well…because everything should have a sprinkle of Parmesan on it, right?

Get creative and throw in your favorite condiments to wow everybody at your next barbeque. Or just make em for dinner tonight. What the heck.

Garlic Baked Potato Wedges
Print Pin

Garlic Baked Potato Wedges

Crispy on the outside, soft and creamy on the inside, Garlic Baked Potato Wedges are the prefect side to any dish.
Course Appetizer, Side Dish
Keyword Homemade, Potatoes
Prep Time 15 minutes minutes
Cook Time 35 minutes minutes
Servings 4

Ingredients

  • 4 large Russet potatoes Use Russet or Yukon Gold. They are drier inside and will result in a crispier potato.
  • ¼ cup olive oil
  • 2 Tbsp minced garlic
  • 1 Tbsp kosher salt
  • 1 Tbsp paprika
  • 1 Tbsp fresh black pepper
  • 1 tsp onion powder
  • ⅔ cup grated or shredded Parmesan cheese divide in half
  • 2 Tbsp fresh rosemary, minced

Instructions

  • Preheat oven to 400°. Line a baking sheet with parchment paper.
  • Cut each potato in half along the length, then cut each half in half along the length again, and cut each quarter in half along the length once more. You should have 8 equal sized wedges.
  • In a small bowl, combine the oil, garlic, onion powder, salt, rosemary, pepper and paprika. Pour the mixture over the potatoes and toss with your hands to coat evenly.
  • Arrange potato wedges in a single layer on a large baking sheet, skin-sides-down. Sprinkle with half of the Parmesan cheese and extra salt and pepper if you're feeling like it.
  • Bake for 20 minutes, then turn wedges with a spatula so all the sides get golden and crisp. Bake for another 15 minutes then test with a fork to see if they are soft indide.
  • Sprinkle with remaining Parmesan cheese and serve hot.

Filed Under: Bites and Tastes, Companions

Zucchini Fritters

May 29, 2020 by How Did You Cook That

Zucchini Fritters

Zucchini fritters are unbelievably easy to put together and prepare. Grate zucchini, drain, squeeze and drain again then toss into a bowl with a bunch of simple fresh ingredients. Scoop zucchini “batter” onto a hot skillet. Flatten, cook. Flip, cook. Serve hot and tasty with a dollop of yogurt or sour cream. How easy it that?

Zucchini fritters are a nutritious, sugar-free way to use up a bounty of zucchini fresh from your garden. Simple fritters that are so crispy and full of flavor even your most finicky eaters will go back for seconds.

Zucchini Fritters
Print Pin

Zucchini Fritters

Zucchini fritters are a nutritious, sugar-free way to use up a bounty of zucchini fresh from your garden.
Course Appetizer
Cuisine Global
Keyword Snack, Vegetarian
Prep Time 15 minutes minutes
Cook Time 10 minutes minutes
Total Time 25 minutes minutes
Servings 4

Ingredients

  • 1½ pounds zucchini grated
  • ¼ cup flour
  • ¼ cup Parmesan cheese grated
  • 2 cloves garlic minced
  • 1 medium shallot minced
  • 1 large egg beaten
  • 2 tsp Kosher salt
  • pinch red pepper flakes
  • fresh ground black pepper to taste
  • 2 Tbsp olive oil

Instructions

  • Place grated zucchini into a colander over the sink. Add 2 tsp salt and toss to combine. Let sit for 10 minutes. Using a clean dish towel or cheese cloth, squeeze zucchini to drain completely. This may take a few squeezings. Zucchini is VERY juicy.
  • In a large bowl, combine zucchini, flour, grated Parmesan, garlic, shallot, red pepper flakes and egg; season with salt and pepper to taste.
  • Heat 2 Tbsp olive oil in a large skillet over medium high heat.
    Scoop about ¼ cup of batter for each fritter, flattening down with a spatula. Cook until the underside is nicely golden brown, about 2 minutes. Flip and cook on the other side, about 1-2 minutes longer.
    Zucchini Fritters
  • Serve immediately. Top with a dollop of sour cream or Greek yogurt and some chopped green onion or chives.

Filed Under: Bites and Tastes, Companions, Vegetarian

Sour Cream and Onion Biscuits

May 19, 2020 by How Did You Cook That

Sour Cream and Onion Biscuits

I arrived really late to the biscuit making game. All the cooks I knew turned out fluffy light biscuits in minutes. My versions were less than perfect. Not so with these Sour Cream and Onion Biscuits. These turn out perfect every time.

Bon Appetite has a terrific video of their folding method for these biscuits. It’ll make a believer out of you.

Gently folding the biscuit dough by hand makes layers in the biscuits for serious pull-apart success. Using sour cream instead of buttermilk adds just the right amount of acidity to help make light and tender biscuits.

Loads of chopped fresh green onions, and maybe an optional dash of parmesan cheese, take these sour cream and onion biscuits over the top. You’ll finish off a plate of these in no time flat.

Serve biscuits hot and fresh out of the oven with a cheesy mound of scrambled eggs.

Sour Cream and Onion Biscuits
Print Pin

Sour Cream and Onion Biscuits

Perfectly fluffy and light biscuits with a sour cream and onion flavor that's out of this world. They bake up perfectly every time.
Course Breakfast, Brunch
Keyword Baking, Biscuits
Prep Time 20 minutes minutes
Cook Time 25 minutes minutes
Total Time 45 minutes minutes
Servings 6

Ingredients

  • 10 scallions
  • 2½ cups all-purpose flour plus extra for kneading
  • 1 Tbsp Kosher salt
  • 2 tsp baking powder
  • ½ tsp baking soda
  • 2 tsp sugar
  • 1¼ cups sour cream
  • 12 Tbsp unsalted butter very cold and divided

Instructions

  • Preheat oven to 400°. Line a baking sheet with parchment paper. (I have used non stick baking sheets and no parchment paper with equal success.)
  • Coarsely chop white and light green parts of scallions.
  • Melt 2 Tbsp butter. Set aside.
  • In a large bowl combine flour, salt, baking powder, baking soda, and sugar. Whisk to combine.
  • Cut remaining cold butter into small ¼" pieces. Add to dry ingredients and toss to coat. With your fingers work butter into the flour pressing it into bits. The mixture should resemble pea-sized sand.
    Add scallions and lightly toss to combine.
  • OPTIONAL: Add 2-3 Tbsp sharp cheddar or Parmesan cheese along with the scallions for a bold flavor.
  • Make a well in the center of the flour mixture and add 1¼ cup sour cream. Mix with a fork until dough just comes together. It should be pretty shaggy.
  • Turn mixture out onto a lightly floured surface and form together with your hands until it comes back together. Keep your hands floured to keep from sticking. Pull loose mixture into the dough and knead once or twice to combine.
  • Pat dough into a rectangle about 1 inch thick, pressing bits of dough that fall back into the dough.
  • Starting at one of the short edges of the rectangle, fold dough toward the center, one third of the way. Then fold the other edge over that and pat into another rectangle. Don't worry if it's a little misshapen here. The idea is to fold and pat, fold and pat to create layers in the dough. You will do this "fold and pat" two times then pat the dough back to a 1 inch thick rectangle about 8 x 4" in size. Square it up and even the edges with a blade or pastry scraper.
  • Cut dough down the center lengthwise, then cut each half into 4 squares of dough. There should be 8 biscuits total.
  • Transfer biscuits to a baking sheet. Brush tops gently with 2 Tbsp melted butter. Don;t skip this step. It makes your biscuits golden brown and just slightly crisp on top.
  • Bake until light golden brown, 20-25 minutes.
  • Serve hot with a side of eggs.

Filed Under: Baking, Breakfast, Companions

Sourdough Country Bread Loaf

May 11, 2020 by How Did You Cook That

Sourdough Country Bread Loaf

Bread is baked in every type of environment all over the world. As you can imagine, that makes for as many different ways to bake bread as there are bakers of bread. Sourdough bread is no exception. In each unique kitchen bread dough is subject to countless, hard-to-control variables. Temperature, humidity, types of water, flour or oven all vary depending on the kitchen, baker or region.

Because of this, there are endless numbers of bread recipes to be found in books and on the internet. My advice: Grab a basic recipe that works for you and make that your starting point. Learn from it, then experiment with it. Change the variables that are more appropriate for your kitchen, your available time or your budget. Try different flours and tools. Keep in mind that this, or any recipe for fermented sourdough bread, is not a guarantee for perfection. It’s just an outline of the specific tools and techniques you will need to get started.

This recipe for a basic country sourdough loaf is the one I use at home, in my own kitchen. I have given specific measurements and times for this bread, however, measurements, length of fermentation, folding, proofing and baking are often different every time I bake it. This is because I may use different combinations or types of flour. It may be summer and blazing hot or winter and quite chilly in my kitchen.

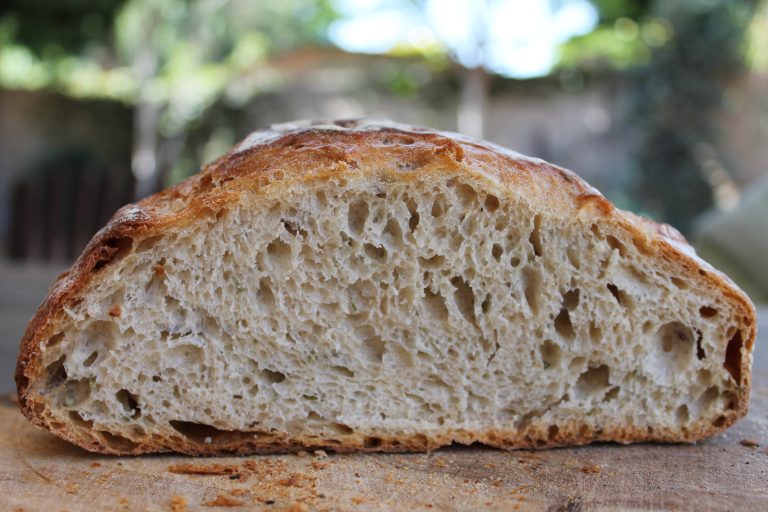
Through much trial and error, I have learned what works and what does’nt work in the process of baking my own bread. My loaves are usually delicious but not always perfect. (The photo on this post is one of my first loaves) I have incorporated many recipes and techniques from bakers all over the world. In the end I have learned to celebrate even the most ragged-looking loaf of whole-grain bread that comes out of my oven.

Be patient and observe the process. It can be frustrating at times. When you make mistakes (yes, you will!) take a picture, laugh and try again another day. Take notes and hang in there.  I think you’ll find the result to be rewarding and very satisfying.

This loaf of organic 100% whole grain, sourdough leavened bread is my Saturday bread. It’s the one I make to get me through the coming week. It’s perfect for French toast, grilled cheese sandwiches or just slathered with bread and jam for afternoon tea. When it gets a bit stale, (it won’t last for that!) cut it up into cubes, toss it with olive oil and garlic and bake up some croutons.

Sourdough Country Bread Loaf
Print Pin

Sourdough Country Bread Loaf

Course Breakfast, Dinner, Lunch
Cuisine Global
Keyword Baking, Bread
Cook Time 10 hours hours
Total Time 10 hours hours
Servings 8

Ingredients

Levain

  • 25 grams sourdough starter wild yeast
  • 100 grams all-purpose flour organic preferred
  • 25 grams whole wheat flour organic preferred
  • 125 grams purified water

Final Bread Dough

  • 350 grams white bread flour organic preferred
  • 50 grams whole wheat flour organic preferred
  • 275 grams purified water lukewarm - 100°
  • 10 grams Kosher salt or sea salt
  • 200 grams sourdough levain that you mixed at the beginning

Instructions

  • Early in the morning, at least an hour before you begin making your bread dough, take out 25 grams of your starter and drop it into a clean container. Add 100 grams white bread flour, 25 grams whole wheat flour and 125 grams of purified water. Give it a stir and let it bubble and mingle for at least an hour. This is how you mix your levain.
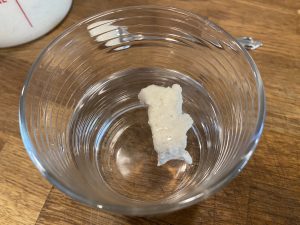
  • Check your levain/starter after about an hour and do a "float" test. Scoop out a spoonful of the yeast and drop it into a cup of water. If it floats to the top, your levain is ready for you to begin mixing your bread dough. If it sinks, WAIT. Check back in another hour to see if it's floaty. Once it floats, proceed to mix your dough.
    Float Test
  • Tip: Weigh out flour first into one container. Then weigh out water in a separate container.
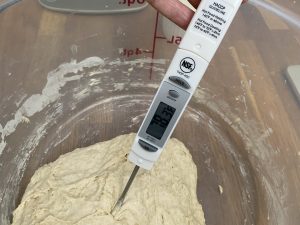
  • The dough should be 78° when you are finished mixing. Water is a big factor that will effect final temperature. Use a thermometer to check water and dough temperature. Write down the temp of the water you use so you can adjust it the next time. Target temperature should be 78°.
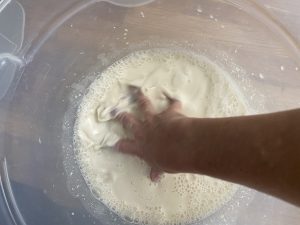
  • Pour 275 grams of water into a mixing container. Add 200g of the levain, (sourdough) that you mixed up earlier, to the water. Use your hand to swirl the sourdough into the water.  Break up any clumps and get it totally mixed together in a cloudy water sort of situation.
    Levain & Water
  • After sourdough/water is completely mixed, add in the flour and mix with your hand to incorporate. It should resemble a shaggy, slightly wet dough. Once the flour is incorporated let the dough rest for 30 minutes. Do not add the salt yet.
  • This 30-minute resting period is called the autolyse. During autolyse the flour absorbs the water and begins to develop dough strength. Set a timer and after thirty minutes, add the salt. If necessary, add a few dribbles of water if the dough is really stiff. Mix with your hand to combine.
  • When mixing I use a "pinch and fold" method; pinching or squeezing the dough with my fingers until it becomes longer, like a fat snake. The pinching helps to evenly distribute the salt. Then I fold the dough 4 times and pinch again. Turning the container and folding and pinching, folding and pinching for about 8-10 minutes.
  • Check the dough temperature. You want it to be 78°. If it's too warm, place it in the fridge to cool it down for a couple of minutes. If it's too cold put it in a warm place in your kitchen.
    Dough Temperature
  • At 78° the dough should take about 3.5 hours to finish its first rise. During those 3.5 hours you will knead the dough every 30-45 minutes. You will do this right inside the container, not on the counter. The dough will get noticeably stronger and more elastic with each fold.
  • Folding means taking the ball of dough, stretching it until just before it tears, and folding it back down onto itself. By doing this the dough gets strength and the temperature gets evenly distributed.
    When folding, work your way around the mixing bowl until you have made a full rotation of the bowl. For me, it is about 4 folds total each time. You should feel the dough becoming less stretchy and more elastic each time you go back to the container to fold it. Ken Forkish has a great video demonstrating this method of folding the dough.
  • When the dough has completed its first rise it will have risen about 30% in volume. I use a clear plastic container with measurements on the outside so I can see the dough rise and fall with each fold.  You can also put a piece of tape at the dough line so you can see how much rise occurs.
  • After about 3-3.5 hours it’s time to shape your dough. Dust your work surface with rice flour (or wheat flour if you do not have any rice flour) and turn the container over, letting the dough release and fall onto the countertop
  • Shape the dough into a boule or round by folding just as you did when the dough was in the container. Once you've made a full rotation of folds, flip the dough over using a dough scraper or your hands, and gently work dough into a circular ball shape.
  • Remember: Shaping takes years to get really good at. Be patient, it’s easy to get frustrated, but you will get this over time. It takes practice.
  • Grab a bowl or basket big enough to hold the loaf. A colander works really well for this too. Line it with a clean lint free kitchen cloth and dust generously with flour. Pick the loaf up and place it into the "basket" you've created, seam side down. The seams will become the top of the loaf once baked and will open naturally as the dough expands.
  • Let the dough do a second rise (also called proof) in the fridge.
    Proofing allows the dough to rise just a bit more and adds flavor.
    Note: You can proof your basket of dough on the counter for 1 hour, if you want to fast track this loaf and bake it in the same day. Pre-heat your oven to 500° while dough is proofing on the counter. Continue with steps to bake following proof.
  • If refrigerating, stick the basket/bowl of dough, kitchen towel and all into a plastic bag to prevent the loaf from drying out or creating a "skin" over the top. Put it in the fridge between 12-24 hours.
  • One hour before baking, pre-heat oven to 500°. Use a cast iron or ceramic pot (LeCreuset, Lodge, etc.) to bake your loaf in. I use the combo cooker by Lodge. Put the cast iron pot and lid into the oven. Allow oven and pot to heat for one hour.
  • After an hour of pre-heating remove your loaf from the fridge. Dust with flour to avoid any stickiness.
    Remove pot from oven. (Use oven gloves! The pot gets VERY hot and steamy and it’s easy to get burned. The scars on my forearms are evidence of this.) Keep oven gloves nearby. You are going to pull the pot out of the oven, set it on the stove top, and open it up. Smoke and steam will come out. It's very hot!
  • Still wearing the oven gloves, turn out your dough from your proofing bowl/basket into your gloves. The loaf should not stick, if it does, try to remain calm, and gently ease it out. (Make a note to use more flour next time.)
    Carefully place the loaf into the shallow/lid side of the cast iron pot. Put pot lid back on and put the pot into the oven.
    Nice job!
  • Bake for 25 minutes. After 25 minutes put on your oven gloves and remove the lid of the pot, being VERY careful as steam will, again, come out from underneath. Turn the oven down to 450° and let bread bake another 15 minutes.
  • Each oven is different, so keep your eye on the loaf, checking for color. When the loaf is done it should be dark brown, like dark chocolate. Remove the pot from the oven and place loaf on wire rack to cool.
  • Turn that oven off! Tap on the bottom of the loaf. It should sound hollow thudding sound, like a drum.
  • Resist the temptation to slice into your loaf to eat it warm. Bread develops even more flavor as it cools. Allow to completely cool for two hours before slicing.
  • It's a long process, but you’ll love the taste of the final bread. And you’ll get lots of compliments. If you enjoy it, try it again. Practice makes perfect, if you decide to stick with it. There are TONS of methods and recipes all over the internet to try out. My favorites for learning were Ken Forkish’s book, Flour Water Salt Yeast and the Tartine Cookbook.
  • Have fun and happy baking!

Filed Under: Baking, Companions, Tips

How to Feed a Sourdough Starter

May 10, 2020 by How Did You Cook That

Wild Yeast Starter

If you’ve already got a sourdough starter in the kitchen, you will need to maintain a daily feeding schedule to keep it alive and thriving.

You can feed it with any flour that you have on hand, just DO NOT use bleached flours. All-purpose UNBLEACHED flour is fine. I always use organic flour as well. For a more sour and vigorous yeast, use whole wheat or rye flour. If your dough gets too sour, you can transition it to a milder yeast by using all-purpose flour for the next several feedings.

If you are going to be out of town or just want to take a break from feeding your yeasty baby, just cover it and pop it into the fridge. It will keep for up to 3 months.

When you take it out of the fridge, it may look dead or have a liquid floating on top. That’s ok. Stir it and smell it. If it smells like strong beer or wine or strong yeast, that’s a good sign. If it smells like nothing, that’s ok too. If it smells rotten or rancid, it probably is. The liquid that floats on top is fine. It’s called “hooch,” and it’s just a message from your yeast that it wants to be fed. Stir it down and feed your starter.

Sourdough starters are pretty resilient. It’s tough to kill these guys with regular maintenance. Hot temperatures and neglect will be the death of your wild yeast. Keep it cool (72F – 80F) and fed and it will reward you well.

The flour to water ratios in this recipe are what I use to keep waste to a minimum. You can change the amount of flour and water that you use in your starter depending on how much bread you bake with it. You just need to maintain a ratio of 100% flour to 100% water. Any weight or combination of flours is fine. I typically keep 15-25 grams of starter, then add 100 grams of purified room temperature water then add 100 grams of various flours.

Jump in, be patient and enjoy experimenting in the world of fermentation.

Wild Yeast Starter
Print Pin

How to Feed a Sourdough Starter

How to feed a wild yeast sourdough starter for homemade bread
Cuisine Global
Keyword Baking, Bread, Sourdough
Prep Time 10 minutes minutes
Total Time 10 minutes minutes

Ingredients

  • 25 grams starter
  • 50 grams unbleached all-purpose flour or bread flour (organic optional)
  • 50 grams rye or whole wheat or any combination of flours that you have on hand (organic optional)
  • 100 grams purified spring water

Instructions

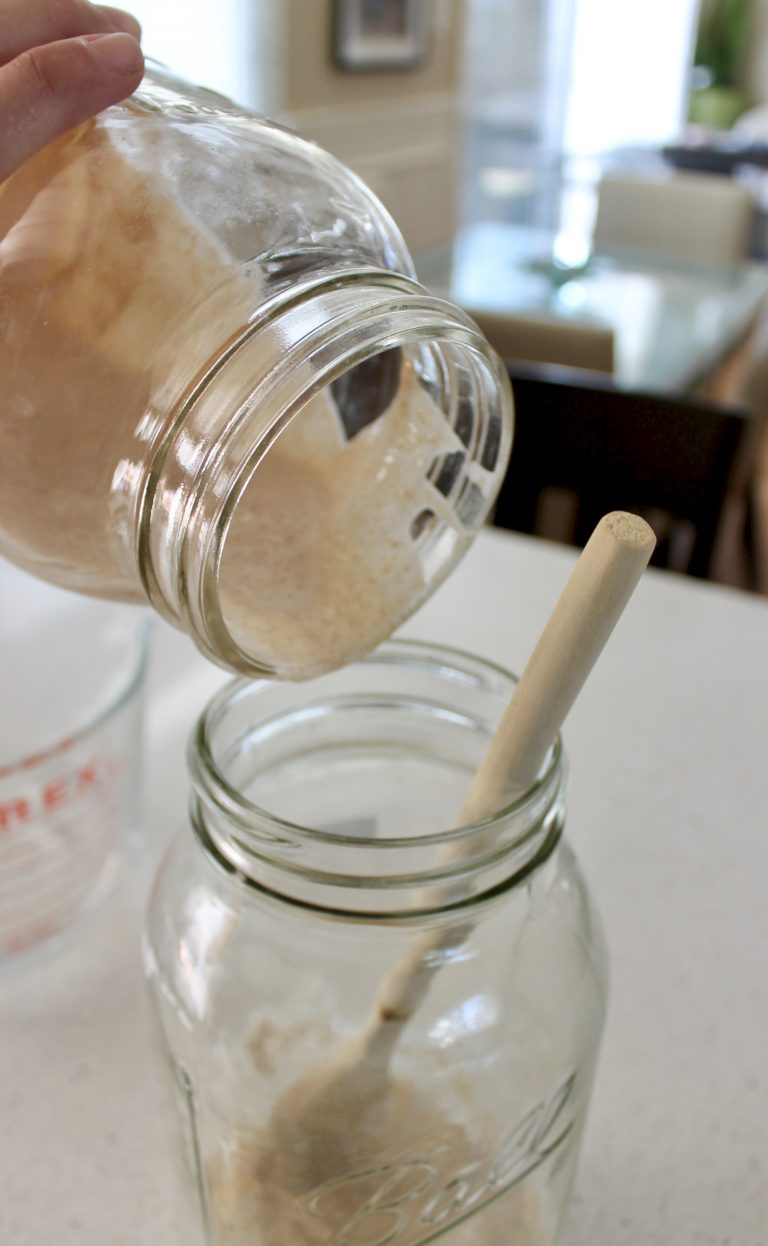
  • Every day, at the same time, pour off 2/3 of the culture, keeping only about 25g. (It’s a good idea to put the 25g seed culture into a clean jar to mix the next day’s batch. I rotate two jars back and forth every morning.)
  • Mix together all-purpose flour, whole wheat flour and purified water. Mix well and cover. Try using a coffee filter secured with a re-used produce rubber band. This allows the live culture to continue gathering wild yeast from the air around you.
  • If you forget to feed, don't worry. Just feed once you remember. Sourdough's are pretty resilient and will not "die" easily.
  • If you don't want to feed daily, keep the sourdough starter in the fridge.

Filed Under: Baking, Companions, Tips

Baked Macaroni and Cheese

May 6, 2020 by How Did You Cook That

My kids love crispy creamy baked macaroni and cheese. Not the blue boxed stuff; the real baked cheesy deal. I think they learned to love it when we lived in the South. There, everyone serves mac ‘n cheese as a side vegetable.

For this recipe, make it count. Grate sharp cheddar cheese fresh from the block. Pre-shredded cheese won’t give you that great sharp bite. It also won’t melt smoothly into creamy goodness while it cooks.

This Baked Macaroni and Cheese recipe is destined to become your favorite. And no, it’s still not a vegetable.

Baked Macaroni and Cheese
Print Pin

Baked Macaroni and Cheese

Creamy cheesy baked macaroni and cheese. Baked to a golden brown and melting in your mouth with every bite. This yummy comfort food dish takes only a few minutes to prepare and is on the table in less than an hour.
Course Appetizer, Main Course
Keyword Cheese, Pasta
Prep Time 15 minutes minutes
Cook Time 20 minutes minutes
Total Time 35 minutes minutes
Servings 6

Ingredients

  • 8 ounces elbow macaroni (or any shape that you like) cooked
  • 2 cups milk
  • 2 Tbsp butter
  • 2 Tbsp flour
  • 1 tsp salt
  • 1 tsp onion powder
  • 1 tsp red pepper flakes
  • 8 ounce sharp cheddar cheese
  • 1 ounce parmesan cheese

Instructions

  • Preheat oven to 400°.
  • Cook pasta according to package directions. Drain and set aside.
  • Grate cheeses together into a medium bowl. Set aside.
  • Heat milk to warm it but not boil it. Just 1½ - 2 minutes.
  • Make a basic cream sauce (or bechamel). Melt butter in a large skillet or Dutch oven over medium-low heat; whisk in flour until smooth. Cook, whisking constantly, 1 minute.
    Gradually whisk in warm milk, and cook, whisking constantly, about 5 minutes until thickened.
  • Whisk in salt, red pepper flakes and 1 cup shredded cheeses. Stir in pasta. Pour pasta mixture into a lightly greased 2-qt. baking dish. Layer on remaining cheeses. Bake at 400° for 20 minutes. Top will be golden brown and center will be bubbling.

Filed Under: Bites and Tastes, Companions, Main Dishes

  • Page 1
  • Page 2
  • Go to Next Page »

Primary Sidebar

Hi food lovers. Welcome to my kitchen.

If you're looking for simple dishes made with wholesome, seasonal ingredients, you've come to the right place. Grab a fork and take a bite. Dig In →

Coriander Seeds
Strawberry Rhubarb Galette
Coconut Peach Popsicles

Categories

Favorite Resources

Cook Books

What’s New

  • Roasted Garlic Tomatoes with Thyme
  • Crisp Green Salad with Sweet Honey Vinaigrette
  • Number One Ice Cream
  • Street Corn Soup
  • Egg In A Jar

Footer

  • Email
  • Facebook
  • Instagram
  • YouTube

Find Recipes

Never Miss a Recipe

Copyright © 2025 How Did You Cook That on the Foodie Pro Theme