• Skip to primary navigation
  • Skip to main content
  • Skip to primary sidebar
  • Skip to footer

How Did You Cook That

  • Recipes
    • Main Dishes
      • Street Corn Soup
      • Maple Ginger Chicken and Asparagus
      • Homemade Gnocchi with Garlic and Parmesan
      • Loaded Baked Potato Soup
      • Beef Bourguignon
      • Grilled Salmon Tacos
      • Thai Inspired Shrimp Curry Soup
      • Chicken and Sausage Gumbo
      • Cast Iron Skillet Pizza
        • Vegetarian
          • Creamy Sweet Potato Curry
          • Pan Tossed Vegetarian Noodles
          • Zucchini & Mushroom Bucatini
          • Stir Fried Baby Bok Choy
          • Roasted Red Pepper and Tomato Soup
          • Potato Leek Soup
          • Portobello “Steak” and Potatoes
          • Cheesy Cauliflower & Carrot Soup
    • Companions
      • Roasted Garlic Tomatoes with Thyme
      • Crisp Green Salad with Sweet Honey Vinaigrette
      • Zucchini Fritters
      • Easy Flat Bread
      • Animal Style French Fries (Copy Cat Version)
      • Cheesy Jalapeno Cornbread
      • Buffalo Cauliflower Bites
    • Breakfast
      • Chilaquiles Rojos with Eggs
      • Sour Cream and Onion Biscuits
      • Dutch Baby with Blueberries
      • Blueberry Lemon Muffins with Streusel Topping
      • Egg In A Jar
      • Creamy Acai Bowls
      • Baked Irish Oats with Cream
      • Fluffy Buttermilk Pancakes
      • Original French Crepes
      • Vanilla Spiced Overnight Oats
      • Seriously Delicious Waffles
      • Southern Buttermilk Biscuits
    • Sauces
      • Creamy Thousand Island Dressing
      • Spicy Mango Salsa
      • Favorite Avocado Recipes
      • Loquat Marmalade
      • Adobo Chile Aioli
    • Desserts
      • Number One Ice Cream
      • Loaded Trail Mix Cookies
      • Toasted Candied Pecans
      • Angel Food Loaf Cake
      • Easy Banana Zucchini Bread
      • Triple Chocolate Cake with Whipped Ganache Frosting
      • Key Lime Cheesecake
      • Cinnamon Sour Cream Coffee Cake
      • Zach’s Chocolate Chip Cookies
      • Strawberry Rhubarb Galette
      • Spiced Cheesecake
      • Berry Fruit Crumble
      • Banana Cinnamon Crunch Bread
    • Thirst Quenchers
      • The Forager Cocktail
      • Cucumber Cilantro Gin Tonic
      • Sunrise Glow Smoothie
      • Three Day Ginger Beer
  • Experiences
    • Los Angeles Pop Ups – Zoe Food Party
    • Los Angeles Bread Crawl
    • The Great Outdoors (A Basic Pantry List)
  • Food Muse
    • A Note About Sugar
    • No More Plastic!
    • Best Buttermilk Substitutions
    • Prepping and Storing Cilantro
    • Home Roasted Coffee
  • Sugar Loaf
    • How to Feed a Sourdough Starter
    • Sourdough Pancakes
    • Sourdough Country Bread Loaf
  • About
  • Navigation Menu: Social Icons

    • Facebook
    • Instagram

How Did You Cook That

Homemade Gnocchi with Garlic and Parmesan

June 8, 2020 by How Did You Cook That

Homemade Gnocchi

Holy cow, you can make your own gnocchi at home? I once thought those deliciously chewy balls of pasta came from a bag at the store. When I heard that I could make them easily at home with potatoes and some flour I was skeptical but willing. Homemade gnocchi with garlic and Parmesan takes this pasta to a whole new level.

My first attempt was pretty rustic looking but absolutely delicious! I’m improving my form but the flavor of these little nuggets of pasta is out of this world, no matter what they look like. Be patient and keep at it. The process is WAY easier than you can imagine. And in just an hour this recipe serves up a delicious pasta dish that you can honestly proclaim, “I did it myself”.

For this particular dish I cooked the gnocchi first. Then fried it with garlic butter and sprinkled it with Parmesan and fresh chopped basil. You can toss your gnocchi with homemade pesto or fresh tomato sauce and olive oil. Whatever floats your boat. Homemade gnocchi is sturdy, starchy and pairs well with just about any sauce you can dream up.

I don’t have a potato ricer. Instead I use a hand masher to mash up the potatoes really well. If any large pieces are left behind I just pick them out. I also bake my potatoes with the skin on rather than boiling them. I find that this keeps them from having too much moisture in them. You can also press the baked potatoes through a sieve.

Homemade Gnocchi
Print Pin

Homemade Gnocchi with Garlic and Parmesan

In just an hour serve up a delicious skillet of gnocchi that can be served with pasta sauce, olive oil or fried with butter and garlic.
Course Dinner, Lunch
Keyword Homemade, Pasta
Servings 4

Ingredients

  • 1 pound Russet or Yukon Gold potatoes scrubbed with skin on
  • 1 cup AP or 00 flour
  • 1 tsp Kosher salt

Instructions

Make the Gnocchi

  • Preheat oven to 400°.
  • Scrub potatoes and bake for 30 minutes or until soft when pierced with a fork.
  • Remove from oven and let cool just enough to peel. After peeling potatoes begin working with them immediately so that they do not become sticky.
  • Pass potatoes through a potato ricer or mash, mash, mash with a hand masher. Remove large pieces. A sieve will work for this process too.
  • Mix together the flour and salt and place on a flat work surface. Make a well in the middle and add the potatoes. Then add the egg. Mix together with your fingers to form a soft dough. It should not stick to your fingers. Add more flour if necessary.
  • On a lightly floured surface, cut small amounts of dough to form ropes and cut into 3/4 inch pieces.
    Homemade Gnocchi
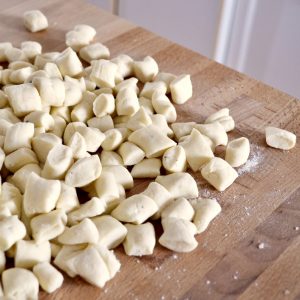
  • Slide a fork along each piece and gently squeeze. Gently.
  • Sprinkle with a little bit of flour and toss, so they don't stick together. Let the gnocchi rest for 20 minutes.
  • Heat a large pot of salted water to boiling. After gnocchi has rested 20 minutes drop pieces, in batches, into the boiling water. As soon as they float they are done. Remove them to a colander. Continue until all are cooked.
  • Potato gnocchi can be left uncooked and covered for no more than a couple of hours. Cooking may take a little longer once they have dried out a bit in the air.
    Gnocchi can also be frozen. Place uncooked gnocchi on a cookie sheet in the freezer. Leave for approximately 20 minutes then seal them in an airtight freezer bag. They will keep for about 1 month.
    When you cook them do not defrost, just add them to boiling salted water.

Garlic and Parmesan Stir Fry

  • In a large skillet heat butter until melted and bubbling but not browned. Turn down heat and add garlic. Stir for 45 seconds to cook garlic but do not brown it. Remove garlic from skillet leaving butter in the skillet.
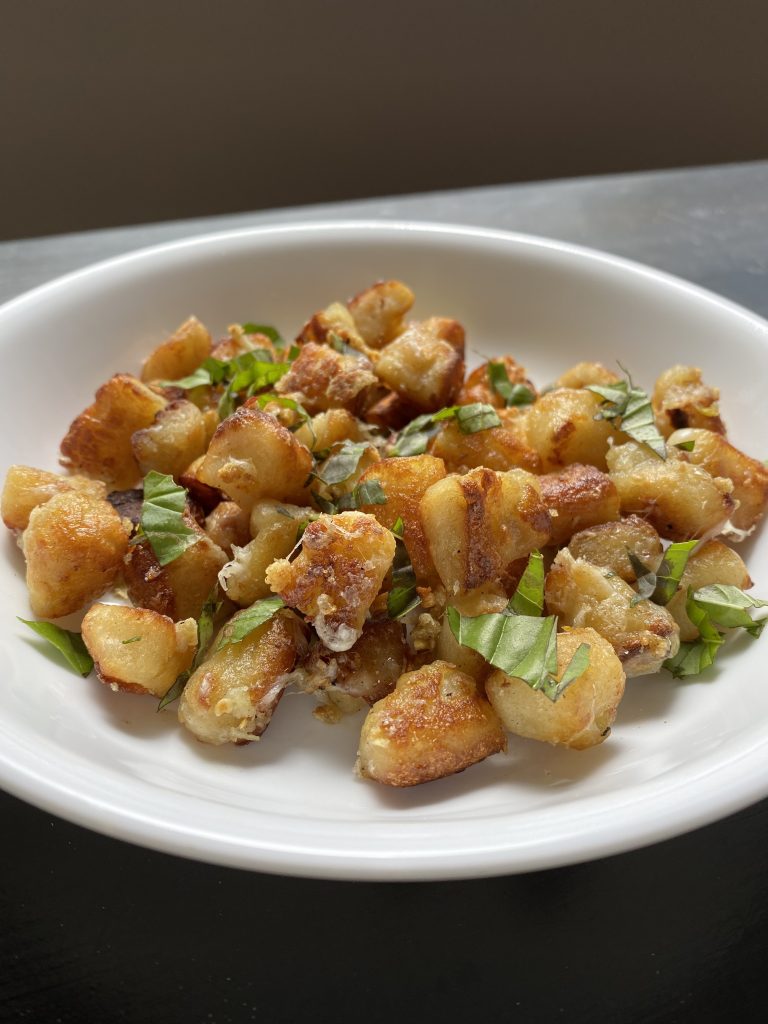
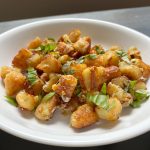
  • Turn heat on skillet up to medium high. Add enough gnocchi to cover the bottom of skillet and fry in garlic butter, turning each piece until golden and crisp. Sprinkle with finely grated Parmesan cheese and give gnocchi one more stir to coat.
  • Remove to plates, season with salt and pepper to taste and sprinkle with fresh chopped basil.

Filed Under: Main Dishes

Creamy Red Beans and Rice

May 31, 2020 by How Did You Cook That

Southern Red Beans and Rice

The cookbook Louisiana Real and Rustic by Emeril Lagasse had a huge influence on my early cooking. I made every single recipe in that book, eager to learn everything I could about cooking. And about my new town of New Orleans. One of my very favorite southern dishes was, and still is, Red Beans and Rice.

Although southern Red Beans and Rice is traditionally served on Mondays in New Orleans, I now make it any day of the week. It’s my go to comfort food when I’m missing NOLA.

Southern Red Beans and Rice is truly the essence of Louisiana and New Orleans cooking. It is such a local staple that Louis Armstrong added, “Red Beans and Ricely Yours,” to his correspondence letters.

My red beans and rice recipe has evolved, as I learned to add more flavor and spice to my cooking. This pot of stew is rich and full of flavor. The ingredients are enough to provide plenty of leftovers throughout the week.

So pour yourself an ice cold Abita beer, turn up the volume on some Louis Armstrong, and get to cooking. 

Southern Red Beans and Rice
Print Pin

Southern Red Beans and Rice

Southern Red Beans and Rice is truly the essence of Louisiana cooking. Serve this meaty bean stew over a bowl of fluffy white rice. (Can be made vegetarian. Just leave out the meat.)
Course Dinner, Main Course
Keyword Beans, Rice
Prep Time 20 minutes minutes
Cook Time 3 hours hours
Total Time 3 hours hours 20 minutes minutes
Servings 8

Ingredients

  • 1 large yellow onion
  • 1 large red or green pepper use red bell pepper for sweeter bean flavor
  • 3-4 stalks celery
  • 4 cloves garlic minced
  • 2 Tbsp butter
  • 1 pound dried red beans I use Camellia brand red beans
  • 1 quart chicken broth
  • 2 Tbsp canola oil
  • 1 pound beef sausage link
  • 3-4 strips of bacon
  • 1 chicken breast or chicken tenders
  • 2 bay leaves
  • 1 tsp ground cayenne
  • salt and pepper to taste
  • 1-2 cups white rice

Instructions

  • Triple rinse red beans in a colander. Set aside. (You can also soak beans overnight if that is your thing.)
  • In a large stockpot over medium heat bring chicken broth to a simmer. Add red beans and reduce heat to low.
  • While beans are simmering, chop red bell pepper, onion, celery and mince the garlic. Set aside.
  • Cut beef sausage link into rounds, then cut rounds in half. Chop 3-4 slices of bacon into ½ inch pieces. Cut chicken breast into rough ½ inch pieces.
  • In a skillet over medium heat add 1 Tbsp canola oil and 1 Tbsp butter. Add chicken and cook until no longer pink. Add bacon and sausage and cook meats together until browned. Remove from skillet to a plate.
  • In the same skillet with drippings from the meats cook the onion, pepper and celery until wilted, scraping up browned bits from the bottom of the skillet. Add remaining butter and canola oil. Add the minced garlic and cook for another 30 seconds. Do not let the garlic brown.
  • Add the cooked vegetables and drippings to the pot of beans. Add meat to the pot of beans. Remove a cup of liquid from the beans and use it to deglaze the skillet, then add all the liquid back into the stock pot. Add bay leaves to the pot.
  • Bring pot to a low boil for 15 minutes then reduce heat to low and simmer for 2 hours. Add more broth or water to achieve your desired consistency for the beans.
  • After 2 hours press some of the softened beans against the sides of the pot to smash. Continue to smash the beans until the broth becomes creamy and thickened. You do not need to smash all of the beans. Just enough to achieve creaminess. Remove bay leaves. Simmer on low for another 10 minutes or so.
  • Cook 1-2 cups of rice. More or less depending on your serving needs.
  • Serve red beans in bowls over rice. Garnish with parsley or green onions.

Filed Under: Main Dishes

Cucumber Cilantro Gin Tonic

May 31, 2020 by How Did You Cook That

Cucumber Cilantro Gin Tonic

This refreshing summer cocktail is crisp and light with a hint of Latin flair. To be honest, it’s a Gin Tonic more than a Gin AND tonic.

Cucumber, Cilantro, Gin, and Tonic water all blend together in a fresh, clean summery chiller. This bright libation is a mellow tonic for a steamy summer afternoon.

Looking for swap out ideas for the gin? Try tequila or vodka, if that’s more your liking. Spicy chili salt on the rim is a lip-smacking extra, if you go with tequila.

This tonic is a perfect drink for entertaining. Mix up a pitcher and serve with a platter of grilled veggie tacos or Mexican grilled shrimp.

Cheers to this fresh citrusy departure from traditional margarita faire.

Cucumber Cilantro Gin Tonic
Print Pin

Cucumber Cilantro Gin Tonic

A refreshing summer cocktail that's crisp and light with a hint of Latin flair. It's a Gin Tonic more than a Gin AND tonic. Perfect served with grilled veggies or a platter of tacos.
Course Beverages, Happy Hour
Keyword Gin
Servings 2

Ingredients

  • ⅔ cup London Dry Gin
  • ½ cup Persian or English cucumber, chopped
  • ½ cup fresh cilantro, roughly chopped
  • ⅛ - ¼ cup fresh squeezed lime juice
  • 1 cup tonic water, chilled
  • 1 - 2 cups ice cubes
  • thinly sliced strips of cucumber, lime wedges and fresh cilantro sprigs for garnish

Instructions

  • Add gin, cucumber, cilantro and lime juice to a cocktail shaker. Muddle together very well, pressing into the cucumber to release all of the juices and flavor.
    Drop in 3 or 4 ice cubes. Cover and shake vigorously.
    Fill 2 cocktail glasses with ice. Pour in gin and cucumber mixture. Top off with chilled tonic water.
    Garnish and serve.

Filed Under: Thirst Quenchers

Creamy Sweet Potato Curry

May 29, 2020 by How Did You Cook That

Creamy Sweet Potato Curry

Creamy sweet potato curry is one of my favorite dishes. It’s the perfect comfort food to make on those nights when you are wondering what to make for dinner. This creamy curry is both vegetarian and vegan and packs a mighty punch of flavor and spice. 

A rich curry with minimal ingredients that all come together in about 20 minutes for a quick and satisfying meal. Serve creamy sweet potato curry over a bowl of steamy sticky rice. What you don’t eat tastes even better the next day and will keep for up to 5 days in the fridge.

Creamy Sweet Potato Curry
Print Pin

Creamy Sweet Potato Curry

Course Dinner, Lunch
Cuisine Global
Keyword Soup
Servings 4

Ingredients

  • 2 pounds sweet potatoes peeled and cut into ¼" cubes
  • 2 shallots halved and thinly sliced
  • 2 cloves garlic minced
  • 1 Tbsp fresh ginger minced
  • 1 Tbsp peanut oil
  • 3 cups fresh baby spinach
  • 3 Tbsp red curry paste
  • 1 14 ounce can coconut milk
  • 1 cup vegetable broth
  • ½ cup chopped peanuts divided
  • ¼ - ½ cup chopped cilantro divided
  • 1 cup rice (basmati, brown, white) cooked

Instructions

  • Cook rice and set aside for serving.
  • Heat peanut oil over medium high heat. Add the shallots and stir until soft and fragrant. Add the garlic, ginger and sweet potatoes and stir to coat with oil and minced aromatics. Add the red curry paste and stir until combined.
  • Add coconut milk and vegetable broth. Simmer over low heat for about 15 minutes until sweet potatoes are softened.
  • Add ¼ cup peanuts and a tablespoon or two of cilantro. Give it a good stir then add the spinach and cook just until wilted.
  • Remove from stove and serve in bowls over rice. Sprinkle on remaining peanuts and cilantro to taste.

Filed Under: Main Dishes, Vegetarian

Zucchini Fritters

May 29, 2020 by How Did You Cook That

Zucchini Fritters

Zucchini fritters are unbelievably easy to put together and prepare. Grate zucchini, drain, squeeze and drain again then toss into a bowl with a bunch of simple fresh ingredients. Scoop zucchini “batter” onto a hot skillet. Flatten, cook. Flip, cook. Serve hot and tasty with a dollop of yogurt or sour cream. How easy it that?

Zucchini fritters are a nutritious, sugar-free way to use up a bounty of zucchini fresh from your garden. Simple fritters that are so crispy and full of flavor even your most finicky eaters will go back for seconds.

Zucchini Fritters
Print Pin

Zucchini Fritters

Zucchini fritters are a nutritious, sugar-free way to use up a bounty of zucchini fresh from your garden.
Course Appetizer
Cuisine Global
Keyword Snack, Vegetarian
Prep Time 15 minutes minutes
Cook Time 10 minutes minutes
Total Time 25 minutes minutes
Servings 4

Ingredients

  • 1½ pounds zucchini grated
  • ¼ cup flour
  • ¼ cup Parmesan cheese grated
  • 2 cloves garlic minced
  • 1 medium shallot minced
  • 1 large egg beaten
  • 2 tsp Kosher salt
  • pinch red pepper flakes
  • fresh ground black pepper to taste
  • 2 Tbsp olive oil

Instructions

  • Place grated zucchini into a colander over the sink. Add 2 tsp salt and toss to combine. Let sit for 10 minutes. Using a clean dish towel or cheese cloth, squeeze zucchini to drain completely. This may take a few squeezings. Zucchini is VERY juicy.
  • In a large bowl, combine zucchini, flour, grated Parmesan, garlic, shallot, red pepper flakes and egg; season with salt and pepper to taste.
  • Heat 2 Tbsp olive oil in a large skillet over medium high heat.
    Scoop about ¼ cup of batter for each fritter, flattening down with a spatula. Cook until the underside is nicely golden brown, about 2 minutes. Flip and cook on the other side, about 1-2 minutes longer.
    Zucchini Fritters
  • Serve immediately. Top with a dollop of sour cream or Greek yogurt and some chopped green onion or chives.

Filed Under: Bites and Tastes, Companions, Vegetarian

Dutch Baby with Blueberries

May 27, 2020 by How Did You Cook That

Dutch Baby

Dutch babies!  These big, fluffy, super egg-y pancakes bake up in a skillet, rising to the morning beautifully. And they are delicious. I added blueberries to these Dutch babies but you can go plain or fancy. Whatever you’re feeling.

Unlike typical pancake batter, that gets mixed in a bowl, Dutch baby batter is whirled in a blender. This recipe requires just a handful of ingredients and comes together in minutes. I made these Dutch babies with blueberries by tossing fresh blueberries into the skillet filled with batter. Then I loaded it into the oven to bake up together.

Use this recipe as a base and experiment with added ingredients. Try tossing on a bunch of fresh berries or bananas before popping the pan into the oven. If you like chocolate, shave some over the top when they come out of the oven. Coconut, powdered sugar, jam, maple syrup, the options are endless. 

Whip up a batch of Dutch babies for breakfast and see the smiles light up.

Dutch Baby
Print Pin

Dutch Baby with Blueberries

Course Breakfast
Keyword Baking, Breakfast, Brunch
Prep Time 10 minutes minutes
Cook Time 20 minutes minutes
Servings 2

Ingredients

  • ½ cup flour
  • ½ cup milk
  • 3 large eggs at room temperature
  • 4 Tbsp unsalted butter
  • 1 Tbsp sugar
  • 1 tsp vanilla
  • pinch of cinnamon, nutmeg or cardamom

Instructions

  • Pre-heat oven to 425°
  • Add flour, milk, eggs, sugar and vanilla to a blender and blend until thoroughly mixed and frothy.
    After blending be sure that the batter has come to room temperature and is not too cold. If your batter is too cold it will not rise up high in the skillet.
  • Melt 2 Tbsp butter in a cast iron skillet in the oven.
  • Take skillet out of the oven and pour enough batter into the skillet to cover the bottom. Return pan to the oven and bake for 20 minutes, until the cake is puffed and golden. Resist the urge to open the oven, checking through the oven window if possible.
    When dutch baby is puffed and golden reduce oven temperature to 300° and bake five minutes longer.
  • Remove dutch baby from the oven. Remove to a plate or platter and cut or tear into wedges.
    Turn oven back up to 425°. Melt more butter into the skillet and pour in more batter to bake another Dutch baby while you are busy demolishing the first one.
    Serve hot topped with syrup, jam, confectioners' sugar or fresh fruit.

Filed Under: Baking, Breakfast

The Forager Cocktail

May 20, 2020 by How Did You Cook That

The Forager

During the spring here in Los Angeles, the loquat trees explode with fruit. In fact, nearly every neighborhood in LA is filled with loquat trees, heavy with ripe fruit. The first year that I lived in my house I had no idea what these little golden fruits growing on my trees were. And I definitely didn’t know they were edible. The next year I didn’t want to spend endless days cleaning up the hundreds of loquats falling to the ground and sidewalks. So I started searching for ways to eat them and use them in recipes. Enter The Forager cocktail.

I love smooth southern cocktails, fragrant with bourbon and mint. And since loquats are a fruit found predominantly in the American south, it made sense to pair the flavors together.

You probably won’t find loquats in the grocery store produce section. Basically they just grow on trees in backyards and neighborhoods throughout sub-tropical regions. They fill local trees by the thousands, therefore many Angelenos forage the fruits from neighbors, parks and along the street. If you live in a region where you can’t find loquats, try using a combination of peach, mango and pear to get the same flavor. Or just come on out to the West Coast in the spring and forage some off the trees for yourself.

Sip an icy cold Forager on a hot summer day with a basket of spicy fried chicken or black-eyed peas and greens.

Loquat Trees
Print Pin

The Forager

A loquat bourbon cocktail that is similar to a bourbon smash or mint julep. Plump sweet loquats are muddled together with mint leaves and fresh lemon for a refreshing spring/summer cocktail.
Course Beverages, Happy Hour
Keyword Bourbon, Cocktails, Drinks
Prep Time 20 minutes minutes
Servings 2

Ingredients

  • 8 ounces ripe loquats, washed well about 20 loquats
  • 10-12 fresh mint leaves plus more for garnishing
  • 2 Tbsp fresh squeezed lemon juice plus 1 Tbsp for simple syrup
  • 4 ounces Kentucky Bourbon Whiskey (not rye) I use Four Roses, Bulleit or Makers Mark
  • ice
  • 1 cup sugar
  • 1½ Tbsp Blackstrap molasses
  • 1 tsp vanilla

Instructions

Simple Syrup

  • Make the simple syrup ahead of time so that it is completely cooled or chilled when you mix up your cocktails.
  • In a small saucepan, dissolve 1 cup of sugar into 1 cup of purified water. Heat to just simmering and turn off heat. Stir to completely dissolve. Let cool a bit then add molasses, vanilla and 1 Tbsp lemon juice. Allow to completely cool before using or refrigerate overnight.

Cocktail Recipe

  • Prepare the very well-washed and drained loquats by pinching them with your fingers to squeeze the seed(s) out of the center. Put the rest of the fruit, skin and all, into a small bowl. The final weight of the seeded loquats should be 8 ounces.
    Loquat Half
  • In the bottom of a large cocktail shaker muddle the mint leaves. Then add the loquats and muddle together with 2 Tbsp lemon juice and the molasses simple syrup.
  • Add bourbon and ice to the shaker and shake very well.
  • Pour into iced glasses. (if the pulp is too thick to pour through the strainer, use a coarse mesh strainer to do the job) Garnish with mint leaves and lemon zest.
    The Forager

Filed Under: Thirst Quenchers

Sour Cream and Onion Biscuits

May 19, 2020 by How Did You Cook That

Sour Cream and Onion Biscuits

I arrived really late to the biscuit making game. All the cooks I knew turned out fluffy light biscuits in minutes. My versions were less than perfect. Not so with these Sour Cream and Onion Biscuits. These turn out perfect every time.

Bon Appetite has a terrific video of their folding method for these biscuits. It’ll make a believer out of you.

Gently folding the biscuit dough by hand makes layers in the biscuits for serious pull-apart success. Using sour cream instead of buttermilk adds just the right amount of acidity to help make light and tender biscuits.

Loads of chopped fresh green onions, and maybe an optional dash of parmesan cheese, take these sour cream and onion biscuits over the top. You’ll finish off a plate of these in no time flat.

Serve biscuits hot and fresh out of the oven with a cheesy mound of scrambled eggs.

Sour Cream and Onion Biscuits
Print Pin

Sour Cream and Onion Biscuits

Perfectly fluffy and light biscuits with a sour cream and onion flavor that's out of this world. They bake up perfectly every time.
Course Breakfast, Brunch
Keyword Baking, Biscuits
Prep Time 20 minutes minutes
Cook Time 25 minutes minutes
Total Time 45 minutes minutes
Servings 6

Ingredients

  • 10 scallions
  • 2½ cups all-purpose flour plus extra for kneading
  • 1 Tbsp Kosher salt
  • 2 tsp baking powder
  • ½ tsp baking soda
  • 2 tsp sugar
  • 1¼ cups sour cream
  • 12 Tbsp unsalted butter very cold and divided

Instructions

  • Preheat oven to 400°. Line a baking sheet with parchment paper. (I have used non stick baking sheets and no parchment paper with equal success.)
  • Coarsely chop white and light green parts of scallions.
  • Melt 2 Tbsp butter. Set aside.
  • In a large bowl combine flour, salt, baking powder, baking soda, and sugar. Whisk to combine.
  • Cut remaining cold butter into small ¼" pieces. Add to dry ingredients and toss to coat. With your fingers work butter into the flour pressing it into bits. The mixture should resemble pea-sized sand.
    Add scallions and lightly toss to combine.
  • OPTIONAL: Add 2-3 Tbsp sharp cheddar or Parmesan cheese along with the scallions for a bold flavor.
  • Make a well in the center of the flour mixture and add 1¼ cup sour cream. Mix with a fork until dough just comes together. It should be pretty shaggy.
  • Turn mixture out onto a lightly floured surface and form together with your hands until it comes back together. Keep your hands floured to keep from sticking. Pull loose mixture into the dough and knead once or twice to combine.
  • Pat dough into a rectangle about 1 inch thick, pressing bits of dough that fall back into the dough.
  • Starting at one of the short edges of the rectangle, fold dough toward the center, one third of the way. Then fold the other edge over that and pat into another rectangle. Don't worry if it's a little misshapen here. The idea is to fold and pat, fold and pat to create layers in the dough. You will do this "fold and pat" two times then pat the dough back to a 1 inch thick rectangle about 8 x 4" in size. Square it up and even the edges with a blade or pastry scraper.
  • Cut dough down the center lengthwise, then cut each half into 4 squares of dough. There should be 8 biscuits total.
  • Transfer biscuits to a baking sheet. Brush tops gently with 2 Tbsp melted butter. Don;t skip this step. It makes your biscuits golden brown and just slightly crisp on top.
  • Bake until light golden brown, 20-25 minutes.
  • Serve hot with a side of eggs.

Filed Under: Baking, Breakfast, Companions

Blueberry Lemon Muffins with Streusel Topping

May 18, 2020 by How Did You Cook That

Lemon Blueberry Streusel Muffins

These Blueberry Lemon Muffins are decadently fluffy and loaded with blueberries. With just a hint of lemon zest and a crown of super tasty, crumbly streusel topping, these little treats are hard to resist. I love these gorgeous muffins served warm from the oven with a steaming cup of coffee.

For added visual appeal, skip the muffin liners and wrap each well of a muffin tin with parchment paper. Blueberry muffins come out of the oven looking so special and all dressed up for Sunday brunch.

Lemon Blueberry Streusel Muffins
Print Pin

Blueberry Lemon Muffins with Streusel Topping

Decadent, delicious and oh, so pretty. These blueberry muffins with lemon zest and a streusel topping will keep you coming back for more. This adaptable recipe works well with fresh or frozen blueberries. Try it with raspberries or blackberries too.
Course Breakfast, Dessert
Keyword Baking, Muffins
Prep Time 25 minutes minutes
Cook Time 20 minutes minutes
Servings 8

Equipment

  • muffin pan
  • parchment paper or muffin liners (optional)

Ingredients

Streusel Topping

  • ½ cup all-purpose flour
  • ¼ cup sugar
  • 1 tsp cinnamon
  • ½ tsp nutmeg
  • 3 Tbsp butter melted

Muffins

  • 2½ cups all-purpose flour
  • 1 Tbsp baking powder
  • 1 tsp baking soda
  • ½ tsp salt
  • 2 large eggs
  • 1 cup sugar
  • ½ cup butter melted
  • 1 tsp lemon zest
  • 3 Tbsp lemon juice
  • 1 cup whole milk or buttermilk I use Saco Buttermilk Powder
  • 1 Tbsp vanilla extract
  • 2 cups blueberries if using frozen, do not thaw

Instructions

Streusel Topping

  • In a medium bowl, whisk together the flour, sugar, cinnamon and nutmeg.
  • Drizzle in the melted butter and toss until crumbles form. Set aside.

Blueberry Muffins

  • Adjust the oven rack to just above center.
    Preheat oven to 400º.
    To make parchment paper liners cut 5" x 5" squares of parchment paper and line your muffin pan. (Check out this great how-to at The Kitchn)
    If not using cupcake/muffin liners, make sure to spray the cupcake tin generously with baking spray.
    Lemon Blueberry Streusel Muffins
  • In a large bowl, whisk together the flour, baking powder, baking soda, and salt. Set aside.
  • In a separate bowl, whisk together the eggs, sugar, melted butter, lemon zest, and lemon juice. Add milk/buttermilk and vanilla.
  • Gradually add the dry ingredients to the wet mixture and stir with a rubber spatula until just combined. Lumps are ok. Gently fold in the blueberries.
  • Divide the batter into the muffin cups (about 2½ Tablespoons in each) Top with extra blueberries. Evenly sprinkle streusel over each muffin.
  • Bake for 20-25 minutes at 400º. You can do a toothpick test at 20 minutes and see if it comes out clean.
    Remove from the oven and cool for 5 minutes before removing muffins from the pan.
  • Serve warm. In the rare chance that you have any left over, they will keep in the refrigerator for up to 1 week.

Filed Under: Baking, Bites and Tastes, Breakfast, Desserts

Angel Food Loaf Cake

May 18, 2020 by How Did You Cook That

Angel Food Cake

Angel food cake is one of my favorite desserts. It’s light, springy and has a addictive chewiness at the edges. Plus you can eat an entire cake in a single sitting (I know I can!) and not even feel it. Heavenly. Angel Food…oh, I get it.

But if you think angel food cake requires a bundt pan, I’m here to tell you, there’s another way. Angel Food Cake baked in a loaf pan.

Angel Food cake requires egg whites. I make a lot of ice cream custard that uses plenty of egg yolks. I’ve usually got a lot of leftover egg whites multiplying in my fridge.  And my dog can only eat so many of them. In that case, I needed another solution, other than wasting a bunch of egg whites…I really hate wasting food. That said, my small kitchen doesn’t have room for a bundt pan that I’d use only a couple of times a year. My favorite alternative is this Angel Food Cake. In a loaf pan.

This cake is topped with whipping cream shaken up in a jar and fresh strawberries, blueberries, and raspberries from the garden. But you can whip your cream with a mixer.

I used a standard 9 x 5 loaf pan. And here’s a tip: Do NOT grease the pan and DO NOT line it with parchment paper. Angel food cake really needs to stick to the pan for better rise in the oven. Sticking to the pan is important so that the cake stays in the pan when you turn it upside down to cool. 

Another tip: Whip your egg whites at room temperature for maximum loft and fluff. Use cream of tartar, lemon juice or distilled vinegar when whipping. Whichever you have on hand.

You must invert angel food cake while it’s cooling so it maintains its loft. Otherwise it will just be a flat, dense loaf. I simply turn the cake over onto a couple of food cans then come back in an hour to take it out of the pan.

Top angel food cake with your favorite fruit and cream or drizzle with chocolate.

Angel Food Loaf Cake
Print Pin

Angel Food Loaf Cake

Make this airy fluffy light cake easily in a loaf pan. Use the berries you have available and enjoy this sweet summer treat with jam or homemade whipped cream.
Course Dessert
Keyword Baking, Berries, Cake
Prep Time 25 minutes minutes
Cook Time 35 minutes minutes
Cooling Time 1 hour hour
Total Time 2 hours hours
Servings 6

Equipment

  • 9 x 5 loaf pan

Ingredients

  • ¾ cups sugar divided
  • ½ cup cake flour All-purpose is ok
  • 1 Tbsp cornstarch
  • 6 real egg whites (not from a carton)
  • 1 Tbsp cream of tartar, lemon juice OR distilled vinegar
  • ¼ tsp salt
  • whipping cream
  • fresh berries

Instructions

  • Pre-heat oven to 325°
  • Whisk together flour, cornstarch and ¼ cup of the sugar. Reserve ½ cup sugar for the next step.
  • In a clean bowl of a mixer with the whisk attachment, beat the egg whites on medium speed with the cream of tartar (or lemon juice or distilled vinegar if using instead), vanilla, and salt until foamy. About 1 minute.
  • Increase the speed to high and gradually add in the remaining 1/2 cup sugar, 1 tablespoon at a time. Beat until soft hilly peaks form about 3-4 minutes. Do not beat into stiff peaks.
  • Use a rubber spatula to gently fold in the flour ingredients. Add about 1/4 at a time to the egg whites. You want to incorporate all of the flour without deflating the egg whites. Take your time and gently fold. You may have a few small lumps, just make sure there is no dry flour left.
  • Gently pour/spoon the batter into the loaf pan and evenly spread. Bake at 325° for 35-40 minutes or until golden brown and no longer sticky on top.
    Angel Food Cake Batter
  • Turn the pan upside down and rest on top of two jars or cans. Cake must cool upside down for at least 1 hour. Angel food cake will deflate if it cools right-side up.
    Cake cooling hack

Whipping Cream

  • Chill a mixing bowl (or bowl of a stand mixer) in the refrigerator for 30 minutes.
  • Pour 1 cup of very cold heavy whipping cream and 1 Tbsp sugar into the chilled bowl.
  • Using a mixer with whisk attachment, mix the cream and sugar on high until rich and creamy. Do not over-mix or cream will become a dry clump that scoops rather than dollops.
  • To serve, carefully run a butter knife around the edges. Lay the pan on its side and carefully pull the cake out with your knife. You can use an offset spatula and run it under the bottom of the cake to gently pull it from the bottom and sides.
    TIP: Slice the angel food cake with a serrated knife. Gently "saw" down into the cake rather than pushing it down and smashing the cake.
    Serve with fresh strawberries, blueberries, and homemade whipped cream.

Filed Under: Baking, Desserts, Tips

  • « Go to Previous Page
  • Page 1
  • Page 2
  • Page 3
  • Page 4
  • Page 5
  • Interim pages omitted …
  • Page 9
  • Go to Next Page »

Primary Sidebar

Hi food lovers. Welcome to my kitchen.

If you're looking for simple dishes made with wholesome, seasonal ingredients, you've come to the right place. Grab a fork and take a bite. Dig In →

Coriander Seeds
Strawberry Rhubarb Galette
Coconut Peach Popsicles

Categories

Favorite Resources

Cook Books

What’s New

  • Roasted Garlic Tomatoes with Thyme
  • Crisp Green Salad with Sweet Honey Vinaigrette
  • Number One Ice Cream
  • Street Corn Soup
  • Egg In A Jar

Footer

  • Email
  • Facebook
  • Instagram
  • YouTube

Find Recipes

Never Miss a Recipe

Copyright © 2025 How Did You Cook That on the Foodie Pro Theme